In this section, you will find the release notes for each version we release under this major version. If you are looking for the release notes of previous major versions, use the version switcher at the top left of this documentation book. Here is a breakdown of our major version releases.
Version 5.x - May 2023
In this release, we have dropped legacy engines and added support for the BoxLang JVM language, Adobe 2023 and Lucee 6. We have also added major updates to spying and expectations. We continue in this series to focus on productivity and fluency in the Testing language in preparation for more ways to test.
Version 4.x - April 2020
In this release, we have dropped support for legacy CFML engines and introduced the ability to mock data and relationships and build JSON documents.
Version 3.x
In this release, we focused on dropping engine supports for legacy CFML engines. We had a major breakthrough in introducing Code Coverage thanks to the FusionReactor folks as well. This major release also came with a new UI for all reporters and streamlined the result viewports.
Version 2.x
This version spawned off with over 8 minor releases. We focused on taking TestBox 1 to yet a high level. Much more attention to detail and introducing modern paradigms like given-when-then. Multiple interception points, async executions, and ability to chain methods.
This was our first major version of TestBox. We had completely migrated from MXUnit, and it introduced BDD to the ColdFusion (CFML) world.
Version 1.x
What's New With 5.1.0
July 6, 2023
Improvement
TESTBOX-370 `toHaveKey` works on queries in Lucee but not ColdFusion
TESTBOX-373 Update to `cbstreams` 2.x series for compat purposes.
Expectations
TestBox allows you to create BDD expectations with our expectations and matcher API DSL. You start by calling our expect() method, usually with an actual value you would like to test. You then concatenate the expectation of that actual value/function to a result or what we call a matcher. You can also concatenate matchers (as of v2.1.0) so you can provide multiple matching expectations to a single value.
You can prefix your expectation with the not operator to easily cause negative expectations for any matcher. When you read the API Docs or the source, you will find nowhere the not methods. This is because we do this dynamically by convention.
expect( actual )
.notToBe( 4 )
.notToBeTrue();
.notToBeFalse();
Introduction
TestBox is a next-generation testing framework based on BDD (Behavior Driven Development) and TDD (Test Driven Development), providing a clean, obvious syntax for writing tests.
TestBox BDD v5.x
TestBox
TestBox is a next-generation testing framework for the BoxLang JVM language and ColdFusion (CFML) based on BDD (Behavior Driven Development) for providing a clean, obvious syntax for writing tests. It contains not only a testing framework, console/web runner, assertions, and expectations library but also ships with MockBox, A mocking and stubbing companion.
class{
function run(){
describe( "My calculator features", () => {
beforeEach( () => {
variables.calc = new Calculator()
} )
// Using expectations library
it( "can add", () => {
expect( calc.add(1,1) ).toBe( 2 )
} )
// Using assert library
test( "it can multiply", () => {
assertIsEqual( calc.multiply(2,2), 4 )
} )
} )
}
}
/**
* My calculator features
*/
class{
property calc;
function setup(){
calc = new Calculator()
}
// Function name includes the word 'test'
// Using expectations library
function testAdd(){
expect( calc.add(1,1) ).toBe( 2 )
}
// Any name, but with a test annotation
// Using assertions library
@test
function itCanMultiply(){
$assert.isEqual( calc.multiply(2,2), 4 )
}
}
component{
function run(){
describe( "My calculator features", () => {
beforeEach( () => {
variables.calc = new Calculator()
} );
// Using expectations library
it( "can add", () => {
expect( calc.add(1,1) ).toBe( 2 )
} );
// Using assert library
test( "it can multiply", () => {
$assert.isEqual( calc.multiply(2,2), 4 )
} );
} );
}
}
/**
* My calculator features
*/
component{
property calc;
function setup(){
calc = new Calculator()
}
// Function name includes the word 'test'
// Using expectations library
function testAdd(){
expect( calc.add(1,1) ).toBe( 2 )
}
// Any name, but with a test annotation
// Using assertions library
function itCanMultiply() test{
$assert.isEqual( calc.multiply(2,2), 4 )
}
}
Runner
Features At A Glance
Here is a simple listing of features TestBox brings to the table:
BDD style or xUnit style testing
Testing life-cycle methods
integration for mocking and stubbing
TestBox is maintained under the guidelines as much as possible. Releases will be numbered in the following format:
And constructed with the following guidelines:
bumpBreaking backward compatibility bumps the major (and resets the minor and patch)
New additions without breaking backward compatibility bump the minor (and resets the patch)
Bug fixes and misc changes bump the patch
TestBox is open source and licensed under the License. If you use it, please try to mention it in your code or website.
Copyright by Ortus Solutions, Corp
TestBox is a registered trademark by Ortus Solutions, Corp
Help Group:
BoxTeam Slack :
We all make mistakes from time to time :) So why not let us know about it and help us out? We also love pull requests, so please star us and fork us:
By Jira:
TestBox is a professional open source software backed by offering services like:
Custom Development
Professional Support & Mentoring
Training
Official Site:
Current API Docs:
Help Group:
Because of His grace, this project exists. If you don't like this, don't read it, it's not for you.
Therefore being justified by faith, we have peace with God through our Lord Jesus Christ: By whom also we have access by faith into this grace wherein we stand, and rejoice in hope of the glory of God. - Romans 5:5
IDE Tools
A modern editor can enhance your testing experience. We recommend VSCode due to the extensive modules library. Here are the plugins we maintain for each platform.
VSCode Plugin
The VSCode plugin is the best way for you to interact with TestBox alongside the BoxLang plugin. It allows you to run tests, generate tests, navigate tests and much more.
Sublime Plugin
Global Runner
TestBox ships with a global runner that can be used to run pretty much anything. You can customize it or place it wherever you need it. You can find it in your distribution under:
BoxLang: /testbox/bx/test-browser
CFML: /testbox/cfml/test-browser
This is a mini web application to help you run bundles, directory, specs and more.
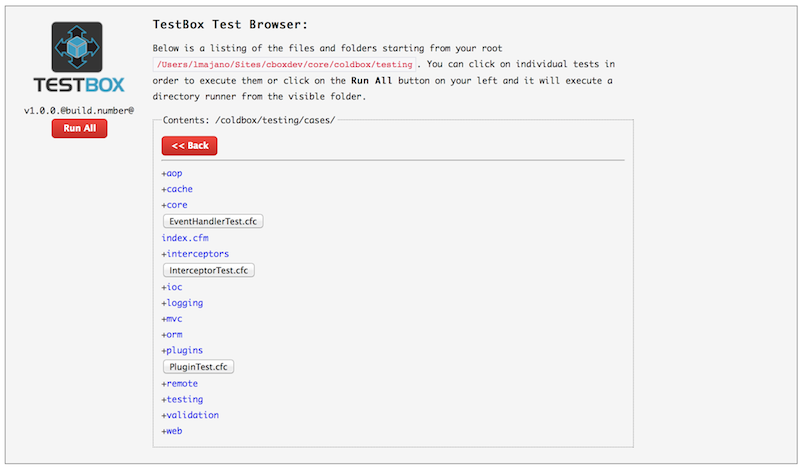
Test Browser
TestBox ships with a test browser that is highly configurable to whatever URL accessible path you want. It will then show you a test browser where you can navigate and execute not only individual tests, but also directory suites as well.
BoxLang: /testbox/bx/test-browser
CFML: /testbox/cfml/test-browser
It is also a mini web application that can be configured to whatever root folder you desire. It will read the runners and tests from that folder and present a GUI that you can use to navigate the test folders and execute them easily.
What's New With 5.3.x
August 1, 2023
The variable thisSuite isn't defined if the for loop in the try/catch is never reached before the error. ()
New expectations: toBeIn(), toBeInWithCase() so you can verify a needle in string or array targets
What's new With 5.2.0
July 28, 2023
Updated mixerUtil for faster performance and new approaches to dynamic mixins
Add `bundlesPattern` to testbox.system.TestBox `init` method
TestBox Modules
expect(sut).toBeInstanceOf("something")) breaks if sut is a query
cbstreams doesn't entirely work outside of ColdBox
toBeInstanceOf() Expectation handle Java classes
MXUnit Compatibility
Legacy Compatibility
TestBox is fully compliant with xUnit test cases. In order to leverage it you will need to create or override the /mxunit mapping and make it point to the /testbox/system/compat folder. That's it, everything should continue to work as expected.
Note you will still need TestBox to be in the web root, or have a /testbox mapping created even when using the MXUnit compat runner.
After this, all your test code remains the same but it will execute through TestBox's xUnit runners. You can even execute them via the normal URL you are used to. If there is something that is not compatible, please let us know and we will fix it.
Bundle(s) Runner
This is more of an approach than an actual specifc runner. This approach shows you that you can create a script file in BoxLang (bxs) or in CFML (cfs|cfm) that can in turn execute any test bundle(s) with many many runnable configurations.
The BoxLang language allows you to run your scripts via the CLI or the browser if you have a web server attached to your project.
If you want to run it in the CLI, then just use:
If you want to run it via the web server, place it in your /tests/ folder and run it
CFML engines only allow you to run tests via the browser. So create your script, place it in your web accessible /tests
NodeJS Runner
There is a user-contributed NodeJS Runner that looks fantastic and can be downloaded here:
You can use node to install as well into your projects.
Create a config file called .testbox-runnerrc in the root of your web project.
Then use the CLI command to run whatever you configured.
testbox-runner
You can also specify a specific configuration file:
Bundles: Group Your Tests
A Test Bundle is a CFC
TestBox relies on the fact of creating testing bundles which are basically CFCs. A bundle CFC will hold all the suites and specs a TestBox runner will execute and produce reports on. Don't worry, we will cover what's a suite and a spec as well. Usually they will have a name that ends with *Spec or *Test.
This bundle CFC can contain 2 life-cycle functions and a single run() function where you will write your test suites and specs.
The beforeAll() and afterAll()
Life-Cycle Data Binding
You can pass in an argument called data , which is a struct of dynamic data, to all life-cycle methods. This is useful when creating dynamic suites and specifications. This data will then be passed into the executing body for each life-cycle method for you.
Here is a typical example:
Specs and Suite Labels
Specs and suites can be tagged with TestBox labels. Labels allows you to further categorize different specs or suites so that when a runner executes with labels attached, only those specs and suites will be executed, the rest will be skipped. You can alternatively choose to skip specific labels when a runner executes with excludes attached.
Focused Specs and Suites
Specs and suites can be focused so ONLY those suites and specs execute. You will do this by prefixing certain functions with the letter f or by using the focused argument in each of them. The reporters will show that these suites or specs where execute ONLY The functions you can prefix are:
it()
Spies & Mocking
Please refer to our section to take advantage of all the mocking and stubbing you can do. However, every BDD TestBundle has the following functions available to you for mocking and stubbing purposes:
makePublic( target, method, newName ) - Exposes private methods from objects as public methods
querySim( queryData ) - Simulate a query
Asynchronous Testing
As you can see from our arguments for a test suite, you can pass an asyncAll argument to the describe() blocks that will allow TestBox to execute all specs in separate threads for you concurrently.
Caution Once you delve into the asynchronous world you will have to make sure your tests are also thread safe (var-scoped) and provide any necessary locking.
Reporters
TestBox comes also with a nice plethora of reporters:
ANTJunit : A specific variant of JUnit XML that works with the ANT junitreport task
Codexwiki : Produces MediaWiki syntax for usage in Codex Wiki
Life-Cycle Methods
TestBox not only provides you with global life-cycle methods but also with localized test methods. This is a great way to keep your tests DRY (Do not repeat yourself)!
beforeTests() - Executes once before all tests for the entire test bundle CFC
afterTests() - Executes once after all tests complete in the test bundle CFC
Spies and Mocking
Please refer to our section to take advantage of all the mocking and stubbing you can do. However, every BDD TestBundle has the following functions available to you for mocking and stubbing purposes:
makePublic( target, method, newName ) - Exposes private methods from objects as public methods
querySim( queryData ) - Simulate a query
Asynchronous-Testing
You can tag a bundle component declaration with the boolean asyncAll annotation and TestBox will execute all specs in separate threads for you concurrently.
Caution Once you delve into the asynchronous world you will have to make sure your tests are also thread safe (var-scoped) and provide any necessary locking.
Reporters
TestBox comes also with a nice plethora of reporters:
ANTJunit : A specific variant of JUnit XML that works with the ANT junitreport task
Codexwiki : Produces MediaWiki syntax for usage in Codex Wiki
Matchers
The toBe() matcher represents an equality matcher much how an $assert.isEqual() behaves. Below are several of the most common matchers available to you. However, the best way to see which ones are available is to checkout the .
Expecting Exceptions
Our default syntax for expecting exceptions is to use our closure approach concatenated with our toThrow() method in our expectations or our throws() method in our assertions object.
Info Please always remember to pass in a closure to these methods and not the actual test call: function(){ myObj.method();}
Example
This will execute the closure in a nested try/catch block and make sure that it either threw an exception, threw with a type, threw with a type and a regex match of the exception message. If you are in an environment that does not support closures then you will need to create a spec testing function that either uses the
Runner Listeners
If you are creating runners and want to tap into the runner listeners or callbacks, you can do so by creating a class or a struct with the different events we announce.
Event
Description
Code Coverage
When writing tests for an app or library, it's generally regarded that more tests is better since you're covering more functionality and more likely to catch regressions as they happen. This is true, but more specifically, it's important that your tests run as much code in your project as possible. Tests obviously can't check code that they doesn't run!
With BDD, there is not a one-to-one correlation between a test and a unit of code. You may have a test for your login page, but how do you know if all the else blocks in your if statements or case blocks in your switch statements were run? Was your error routine tested? What about optional features, or code that only kicks in on the 3rd Tuesday of months in the springtime? These can be difficult questions to answer just by staring at the results of your tests. The answer to this is Code Coverage.
Code coverage does not replace your tests nor does it change how you write your tests. It's additional metrics gathered by the testing framework while your tests are running that actually tracks what lines of code were executed and what lines of code didn't get run. Now you can finally see how much code in your app is "covered" by your tests and what code is currently being untested.
Creating MockBox
The factory takes in one constructor argument that is not mandatory: generationPath. This path is a relative path of where the factory generates internal mocking stubs that are included later on at runtime. Therefore, the path must be a path that can be used using cfinclude. The default path the mock factory uses is the following, so you do not have to specify one, just make sure the path has WRITE permissions:
Hint If you are using Lucee or ACF10+ you can also decide to use the ram:// resource and place all generated stubs in memory.
Console : Sends report to console
Doc : Builds semantic HTML to produce nice documentation
Dot : Builds an awesome dot report
JSON : Builds a report into JSON
JUnit : Builds a JUnit compliant report
Raw : Returns the raw structure representation of the testing results
Simple : A basic HTML reporter
Text : Back to the 80's with an awesome text report
XML : Builds yet another XML testing report
Tap : A test anything protocol reporter
Min : A minimalistic view of your test reports
MinText : A minimalistic view of your test reports in consoles
getMockBox( [generationPath] ) - Get a reference to MockBox
createEmptyMock( [className], [object], [callLogging=true]) - Create an empty mock from a class or object
createMock( [className], [object], [clearMethods=false], [callLogging=true]) - Create a spy from an instance or class with call logging
prepareMock( object, [callLogging=true]) - Prepare an instance of an object for method spies with call logging
createStub( [callLogging=true], [extends], [implements]) - Create stub objects with call logging and optional inheritance trees and implementation methods
getProperty( target, name, [scope=variables], [defaultValue] ) - Get a property from an object in any scope
We also support in the compatibility mode the expected exception MXUnit annotation: mxunit:expectedException and the expectException() methods. The expectException() method is not part of the assertion library, but instead is inherited from our BaseSpec.cfc.
Please refer to MXUnit's documentation on the annotation and method for expected exceptions, but it is supported with one caveat. The expectException() method can produce unwanted results if you are running your test specs in TestBox asynchronous mode since it stores state at the component level. Only synchronous mode is supported if you are using the expectException() method. The annotation can be used in both modes.
beforeEach(
data = { mydata="luis" },
body = function( currentSpec, data ){
// The arguments.data is binded via the `data` snapshot above.
data.myData == "luis";
}
);
describe(title="A spec", labels="stg,railo", body=function() {
it("executes if its in staging or in railo", function() {
coldbox = 0;
coldbox++;
expect( coldbox ).toBe( 1 );
});
});
describe("A spec", function() {
it("is just a closure, so it can contain any code", function() {
coldbox = 0;
coldbox++;
expect( coldbox ).toBe( 1 );
});
it(title="can have more than one expectation and labels", labels="dev,stg,qa,shopping", body=function() {
coldbox = 0;
coldbox++;
expect( coldbox ).toBe( 1 );
expect( coldbox ).toBeTrue();
});
});
describe(title="A spec (with setup and tear-down)", asyncAll=true, body=function() {
beforeEach(function() {
coldbox = 22;
application.wirebox = new coldbox.system.ioc.Injector();
});
afterEach(function() {
coldbox = 0;
structDelete( application, "wirebox" );
});
it("is just a function, so it can contain any code", function() {
expect( coldbox ).toBe( 22 );
});
it("can have more than one expectation and talk to scopes", function() {
expect( coldbox ).toBe( 22 );
expect( application.wirebox.getInstance( 'MyService' ) ).toBeComponent();
});
});
component displayName="TestBox xUnit suite" skip="testEnv" asyncAll=true{
function setup(){
application.wirebox = new coldbox.system.ioc.Injector();
structClear( request );
}
function teardown(){
structDelete( application, "wirebox" );
structClear( request );
}
function testThrows() skip="true"{
$assert.throws(function(){
var hello = application.wirebox.getInstance( "myINvalidService" ).run();
});
}
function testNotThrows(){
$assert.notThrows(function(){
var hello = application.wirebox.getInstance( "MyValidService" ).run();;
});
}
private boolean function testEnv(){
return ( structKeyExists( request, "env") && request.env == "stg" ? true : false );
}
}
toBeTrue( [message] ) : value to true
toBeFalse( [message] ) : value to be false
toBe( expected, [message] ) : Assert something is equal to each other, no case is required
toBeWithCase( expected, [message] ) : Expects with case
toBeNull( [message] ) : Expects the value to be null
toBeInstanceOf( class, [message] ) : To be the class instance passed
toMatch( regex, [message] ) : Matches a string with no case-sensitivity
toMatchWithCase( regex, [message] ) : Matches with case-sensitivity
toBeTypeOf( type, [message] ) : Assert the type of the incoming actual data, it uses the internal ColdFusion isValid() function behind the scenes, type can be array, binary, boolean, component, date, time, float, numeric, integer, query, string, struct, url, uuid plus all the ones from isValid()
toBe{type}( [message] ) : Same as above but more readable method name. Example: .toBeStruct(), .toBeArray()
toBeEmpty( [message] ) : Tests if an array or struct or string or query is empty
toHaveKey( key, [message] ) : Tests the existence of one key in a structure or hash map
toHaveDeepKey( key, [message] ) : Assert that a given key exists in the passed in struct by searching the entire nested structure
toHaveLength( length, [message] ) : Assert the size of a given string, array, structure or query
toThrow( [type], [regex], [message] );
toBeCloseTo( expected, delta, [datepart], [message] ) : Can be used to approximate numbers or dates according to the expected and delta arguments. For date ranges use the datepart values.
toBeBetween( min, max, [message] ) : Assert that the passed in actual number or date is between the passed in min and max values
toInclude( needle, [message] ) : Assert that the given "needle" argument exists in the incoming string or array with no case-sensitivity, needle in a haystack anyone?
toIncludeWithCase( needle, [message] ) : Assert that the given "needle" argument exists in the incoming string or array with case-sensitivity, needle in a haystack anyone?
toBeGT( target, [message] ) : Assert that the actual value is greater than the target value
toBeGTE( target, [message] ) : Assert that the actual value is greater than or equal the target value
toBeLT( target, [message] ) : Assert that the actual value is less than the target value
toBeLTE( target, [message] ) : Assert that the actual value is less than or equal the target value
mockBox = new testbox.system.MockBox();
// Within a TestBox Spec
getMockBox()
/testbox/system/stubs
$count()
Get the number of times a method has been called or the entire number of calls made to ANY mocked method on this mock object. If the method has never been called, you will receive a 0. If the method does not exist or has not been mocked, then it will return a -1.
numeric $count([string methodName])
Parameters:
methodName - Name of the method to get the counter for (Optional)
minNumberOfInvocations - The min number of calls to assert
methodName - The optional method name to assert the number of method calls
// let's say we have a service that verifies user credentials
// and if not valid, then tries to check if the user can be inflated from a cookie
// and then verified again
function verifyUser(){
if( isValidUser() ){
log.info("user is valid, doing valid operations");
}
// check if user cookie exists
if( isUserCookieValid() ){
// inflate credentials
inflateUserFromCookie();
// Validate them again
if( NOT isValidUser() ){
log.error("user from cookie invalid, aborting");
}
}
}
// Now the test
it( "can verify a user", function(){
security = createMock("model.security").$("isValidUser",false);
security.storeUserCookie("invalid");
security.verifyUser();
// Asserts that isValidUser() has been called at least 5 times
expect( security.$atLeast(5,"isValidUser") ).toBeFalse();
// Asserts that isValidUser() has been called at least 2 times
expect( security.$atLeast(2,"isValidUser") ).toBeFalse();
});
$reset()
This method is a utility method used to clear out all call logging and method counters.
void $reset()
security = getMockBox().createMock("model.security").$("isValidUser", true);
security.isValidUser( mockUser );
// now clear out all call logs and test again
security.$reset();
mockUser.$property("authorized","variables",true);
security.isValidUser( mockUser );
$debug()
This method is used for debugging purposes. If you would like to get a structure of all the mocking internals of an object, just call this method and it will return to you a structure of data that you can dump for debugging purposes.
<cfdump var="#targetObject.$debug()#">
$getProperty() Method
This method can help you retrieve any public or private internal state variable so you can do assertions. You can also pass in a scope argument so you can not only retrieve properties from the variables scope but from any nested structure inside of any private scope:
any $getProperty(name [scope='variables']
Parameters:
name - The name of the property to retrieve
scope - The scope where the property lives in. The default is variables scope.
// Test the BDD Bundle
r = new testbox.system.TestBox( "tests.specs.BDDTest" )
println( r.run() );
// Test the bundle with ONLY the passed specs
r = new testbox.system.TestBox( "tests.specs.BDDTest" )
println( r.run( testSpecs="OnlyThis,AndThis,AndThis" ) )
// Test the bundle with ONLY the passed suites
r = new testbox.system.TestBox( "tests.specs.BDDTest" )
println( r.run( testSuites="Custom Matchers,A Spec" ) )
// Test the passed array of bundles
r = new testbox.system.TestBox( [ "tests.specs.BDDTest", "tests.specs.BDD2Test" ] )
println( r.run() )
// Test with labels and the minimal reporter
r = new testbox.system.TestBox( bundles: "tests.specs.BDDTest", labels="linux" )
println( r.run( reporter: "mintext" ) )
BoxLang
CFML
methods are called life-cycle methods. They will execute once before the
run()
function and once after the
run()
function. This is a great way to do any global setup or tear down in your tests.
The run() function receives the TestBox testResults object as a reference and testbox as a reference as well. This way you can have metadata and access to what will be reported to users in a reporter. You can also use it to decorate the results or store much more information that reports can pick up later. You also have access to the testbox class so you can see how the test is supposed to execute, what labels was it passed, directories, options, etc.
Life-Cycle Methods
// executes before all suites
function beforeAll(){}
// executes after all suites
function afterAll(){}
Execution
describe()
story()
given()
when()
then()
feature()
Please note that if a suite is focused, then all of its children will execute.
setup( currentMethod ) - Executes before every single test case and receives the name of the actual testing method
teardown( currentMethod ) - Executes after every single test case and receives the name of the actual testing method
Examples
component{
function beforeTests(){}
function afterTests(){}
function setup( currentMethod ){}
function teardown( currentMethod ){}
}
expectedException
annotation or function call:
Caution Please note that the usage of the expectedException() method can ONLY be used while in synchronous mode. If you are running your tests in asynchronous mode, this will not work. We would recommend the closure or annotation approach instead.
function testMyObj(){
expectedException( [type], [regex], [message] );
}
function testMyObj() expectedException="[type]:[regex]"{
// this function should produce an exception
}
Before a suite (describe, story, scenario, etc)
onSuiteEnd
After a suite
onSpecStart
Before a spec (it, test, then)
onSpecEnd
After a spec
Every run and runRaw methods accepts a callbacks argument, which can be a Class with the right listener methods or a struct with the right closure methods. This will allow you to listen to the testing progress and get information about it. This way you can build informative reports or progress bars.
onBundleStart
When each bundle begins execution
onBundleEnd
When each bundle ends execution
onSuiteStart
describe( "Ability to bind data to life-cycle methods", function(){
var data = [
"spec1",
"spec2"
];
for( var thisData in data ){
describe( "Trying #thisData#", function(){
beforeEach(
data : { myData = thisData },
body : function( currentSpec, data ){
targetData = arguments.data.myData;
});
it(
title : "should account for life-cycle data binding",
data : { myData = thisData },
body : function( data ){
expect( targetData ).toBe( data.mydata );
}
);
afterEach(
data : { myData = thisData },
body : function( currentSpec, data ){
targetData = arguments.data.myData;
});
});
}
for( var thisData in data ){
describe( "Trying around life-cycles with #thisData#", function(){
aroundEach(
data : { myData = thisData },
body : function( spec, suite, data ){
targetData = arguments.data.myData;
arguments.spec.body( data=arguments.spec.data );
});
it(
title : "should account for life-cycle data binding",
data : { myData = thisData },
body : function( data ){
expect( targetData ).toBe( data.mydata );
});
});
}
});
boxlang run.bxs
http://localhost/tests/run.bxs
run.cfm
<cfscript>
// Test the BDD Bundle
r = new testbox.system.TestBox( "tests.specs.BDDTest" )
writeOutput( r.run() );
// Test the bundle with ONLY the passed specs
r = new testbox.system.TestBox( "tests.specs.BDDTest" )
writeOutput( r.run( testSpecs="OnlyThis,AndThis,AndThis" ) )
// Test the bundle with ONLY the passed suites
r = new testbox.system.TestBox( "tests.specs.BDDTest" )
writeOutput( r.run( testSuites="Custom Matchers,A Spec" ) )
// Test the passed array of bundles
r = new testbox.system.TestBox( [ "tests.specs.BDDTest", "tests.specs.BDD2Test" ] )
writeOutput( r.run() )
// Test with labels and the minimal reporter
r = new testbox.system.TestBox( bundles: "tests.specs.BDDTest", labels="linux" )
writeOutput( r.run( reporter: "mintext" ) )
</cfscript>
tests/specs/MySpec.cfc
component extends="testbox.system.BaseSpec"{
// executes before all suites
function beforeAll(){}
// executes after all suites
function afterAll(){}
// All suites go in here
function run( testResults, testBox ){
}
}
function run( testResults, testBox ){
}
fstory( "A spec", function() {
it("was just skipped, so I will never execute", function() {
coldbox = 0;
coldbox++;
expect( coldbox ).toBe( 1 );
});
});
describe("A spec", function() {
it("is just a closure, so it can contain any code", function() {
coldbox = 0;
coldbox++;
expect( coldbox ).toBe( 1 );
});
fit("can have more than one expectation, but I am skipped", function() {
coldbox = 0;
coldbox++;
expect( coldbox ).toBe( 1 );
expect( coldbox ).toBeTrue();
});
});
component displayName="TestBox xUnit suite" labels="railo,cf"{
function setup( currentMethod ){
application.wirebox = new coldbox.system.ioc.Injector();
structClear( request );
}
function teardown( currentMethod ){
structDelete( application, "wirebox" );
structClear( request );
}
function testThrows(){
$assert.throws(function(){
var hello = application.wirebox.getInstance( "myINvalidService" ).run();
});
}
function testNotThrows(){
$assert.notThrows(function(){
var hello = application.wirebox.getInstance( "MyValidService" ).run();;
});
}
}
class{
// Called at the beginning of a test bundle cycle
function onBundleStart( target, testResults ){
}
// Called at the end of the bundle testing cycle
function onBundleEnd( target, testResults ){
}
// Called anytime a new suite is about to be tested
function onSuiteStart( target, testResults, suite ){
}
// Called after any suite has finalized testing
function onSuiteEnd( target, testResults, suite ){
}
// Called anytime a new spec is about to be tested
function onSpecStart( target, testResults, suite, spec ){
}
// Called after any spec has finalized testing
function onSpecEnd( target, testResults, suite, spec ){
}
}
Mocking data library for mocking JSON/complex data and relationships
Ability to extend and create custom test runners and reporters
TestBox supports code coverage statistics out-of-the box with no changes to your test suite and you can capture the data in a handful of ways, including a Coverage Browser report which visualizes every CF file in your code and shows you what lines executed and what lines didn't.
Please note that FusionReactor is a separate product not made by Ortus, but by Intergral GmbH. FusionReactor is a performance monitoring tool for Java-based servers and you will need to purchase a license to use it. We understand you may wish to use code coverage for free, but this feature would not have been possible without the line performance tracking feature of FusionReactor that allows us to match your Java bytecode to the actual code lines of your CFML. For personal use, there is a reasonably-priced Developer Edition. Please reach out to FusionReactor's sales team if you have any questions.
Code Coverage
Requirements
Dynamic Suites
With TestBox's BDD syntax, it is possible to create suites dynamically; however, there are a few things to be aware of.
Setup for dynamic suites must be done in the pseudo-constructor (versus in beforeAll()). This is because variables-scoped variables set in beforeAll() are not available in the describe closure (even though they are available in it closures). This behavior can be explained by the execution sequence of a BDD bundle: When the bundle's run() method is called, it collects preliminary test data via describes. After preliminary test data are collected, the beforeAll() runs, followed by the describe closures.
Additionally, care must be taken to pass data into the it closures, otherwise strange behavior will result (the values from the last loop iteration will be repeated in the body of each looped it).
The following bundle creates suites dynamically, by looping over test metadata.
Running Tests
Running tests is essential of course. There are many ways to run your tests, we will see the basics here, and you can check out our Running Tests section in our in-depth guide.
TestBox CLI
The easiest way to run your tests is to use the TestBox CLI via the testbox run command. Ensure you are in the web root of your project or have configured the box.json to include the TestBox runner in it as shown below. If not CommandBox will try to run by convention your site + test/runner.cfm for you.
You can also pass the runner URL via the testbox run command. Try out the testbox run help command.
Here is a simple box.json config that has a runner and some watcher config.
Every test harness also has an HTML runner you can execute. By convention the URL is
This will execute ALL tests in the tests/specs directory for you.
You can also target a specific spec to execute via the URL
TestBox ships with a global runner that can run pretty much anything. You can customize it or place it wherever you need it:
TestBox ships with a test browser that is highly configurable to whatever URL-accessible path you want. It will then show you a test browser where you can navigate and execute not only individual tests but also directory suites.
Test Bundles
The testing bundle CFC is actually the suite in xUnit style as it contains all the test methods you would like to test with. Usually, this CFC represents a test case for a specific software under test (SUT), whether that's a model object, service, etc. This component can have some cool annotations as well that can alter its behavior.
component displayName="The name of my suite" asyncAll="boolean" labels="list" skip="boolean"{
}
TestBox relies on the fact of creating testing bundles which are basically CFCs. A bundle CFC will hold all the tests the TestBox runner will execute and produce reports on. Thus, sometimes this test bundle is referred to as a test suite in xUnit terms.
component displayName="My test suite" extends="testbox.system.BaseSpec"{
// executes before all tests
function beforeTests(){}
// executes after all tests
function afterTests(){}
}
Bundle Annotations
Argument
Required
Default
Caution If you activate the asyncAll flag for asynchronous testing, you HAVE to make sure your tests are also thread safe and appropriately locked.
Running Tests
Running tests is essential of course. There are many ways to run your tests, we will see the basics here, and you can check out our Running Tests section in our in-depth guide.
TestBox CLI
The easiest way to run your tests is to use the TestBox CLI via the testbox run command. Ensure you are in the web root of your project or have configured the box.json to include the TestBox runner in it as shown below. If not CommandBox will try to run by convention your site + test/runner.cfm for you.
You can also pass the runner URL via the testbox run command. Try out the testbox run help command.
Here is a simple box.json config that has a runner and some watcher config.
Every test harness also has an HTML runner you can execute. By convention the URL is
This will execute ALL tests in the tests/specs directory for you.
You can also target a specific spec to execute via the URL
TestBox ships with a global runner that can run pretty much anything. You can customize it or place it wherever you need it:
TestBox ships with a test browser that is highly configurable to whatever URL-accessible path you want. It will then show you a test browser where you can navigate and execute not only individual tests but also directory suites.
Life-Cycle Annotations
In addition to the life-cycle methods according to your style, you can make any method a life-cycle method by giving it the desired annotation in its function definition. This is especially useful for parent classes that want to hook in to the TestBox life-cycle.
@beforeAll - Executes once before all specs for the entire test bundle CFC
@afterAll - Executes once after all specs complete in the test bundle CFC
@beforeEach - Executes before every single spec in a single describe block and receives the currently executing spec.
@afterEach - Executes after every single spec in a single describe block and receives the currently executing spec.
@aroundEach - Executes around the executing spec so you can provide code surrounding the spec.
Below are several examples using script notation.
DBTestCase.cfc (parent class)
PostsTest.cfc
This also helps parent classes enforce their setup methods are called by annotating the methods with @beforeAll. No more forgetting to call super.beforeAll()!
Custom Assertions
TestBox comes with a plethora of assertions that cover what we believe are common scenarios. However, we recommend that you create custom assertions that meet your needs and criteria so that you can avoid duplication and have re-usability. A custom assertion function can receive any amount of arguments but it must use the fail() method in order to fail an assertion or just return true or void for passing.
You can register assertion functions in several ways within TestBox, but we always recommend that you register them inside of the beforeTests() or setup() life-cycle method blocks, so they are only inserted once.
Inline Assertions
You can pass a structure of key/value pairs of the assertions you would like to register. The key is the name of the assertion function and the value is the closure function representation.
After it is registered, then you can just use it out of the $assert object it got mixed into.
You can also store a of assertions (Yes, I said plethora), in a class and register that as the assertions via its instantiation path. This provides much more flexibility and re-usability for your projects.
You can also register more than 1 class by using a list or an array:
Here is the custom assertions source:
Assertions
TestBox supports the concept of assertions to allow for validations and for legacy tests. We encourage developers to use our BDD expectations as they are more readable and fun to use (Yes, fun I said!).
The assertions are modeled in the class testbox.system.Assertion, so you can visit the API for the latest assertions available. Each test bundle will receive a variable called $assert which represents the assertions object.
BoxLang Assertions
If you are running and testing with BoxLang, you will have the extra benefit of the assertions dynamic methods. This allows you to just called the method in the Assertion object prefixed by assert.
// Normal method
$assert.isTrue()
$assert.between()
$assert.closeTo()
// With BoxLang Dynamic Methods
assertIsTrue()
assertBetween()
assertCloseTo()
Common Assertions
Here are some common assertion methods:
Custom Matchers
TestBox comes with a decent amount of matchers that cover what we believe are common scenarios. However, we recommend that you create custom matchers that meet your needs and criteria so that you can avoid duplication and have re-usability.
Every custom matcher is a function and must have the following signature, with MyMatcher being the name of your custom matcher function:
boolean function MyMatcher( required expectation, args={} )
The matcher function receives the expectation object and a second argument which is a structure of all the arguments with which the matcher function was called with. It must then return a true or a false depending if it passes your criteria. It will most likely use the expectation object to retrieve the actual and isNot values. It can also set a custom failure message on the expectation object itself by using the message property of the expectation object.
The next step is to tell TestBox about your matcher.
You can register matcher functions in several ways within TestBox, but we always recommend that you register them inside of the beforeAll() or beforeEach() life-cycle method blocks for performance considerations and global availability.
You can pass a structure of key\/value pairs of the matchers you would like to register. The key is the name of the matcher function and the value is the closure function representation.
After it is registered, then you can use it.
You can also store a of matchers (Yes, I said plethora), in a class and register that as the matchers via its instantiation path. This provides much more flexibility and re-usability for your projects.
You can also register an instance:
Known Behaviors
There are a few known issues with code coverage that are currently out of our control. We apoligize for any inconvenience they may give you.
Occasional blank page on Lucee when running tests after restart
On some sites we've experienced that after a fresh restart of Lucee Server, when the first page you hit is the test suite and code coverage is enabled, Lucee throws a low level compilation error (which you can see in the logs) and a white page is returned to the browser. We haven't figured out the scenario in which occurs, but refreshing the page always seems to work the second time.
If you run into this on an automated build environment, consider configuring your build to hit a page first, or run the tests again if no results are captured the first run.
Very large CF files won't capture code coverage
This has been reported in Lucee for very large files of CF code. Lucee automatically breaks bytecode into additional methods when compiling to avoid the JVM limits of maximum method sizes in a class file. However, when FusionReactor instruments the byte code (adds additional lines of code in), it can push some of the internal methods over the JVM limit. There will be an error logged to your console and TestBox will have no coverage for the file, showing every line as not executed.
The only workaround at this time is to reduce the size of your CF files so the bytecode isn't as close to the JVM limits. Try moving chunks of code out to includes.
Only executable code should be tracked, meaning a comment, whitespace, or HTML that does not run will not count against your total coverage percentage. When using Adobe ColdFusion, if there are any CF files which did not run at all (and therefore were not compiled) they will count every line in the file as executable since FusionReactor is only capable of tracking files which are compiled. Lucee has a workaround to manually force compilation on such files, but Adobe does not.
The best work around is to improve your tests so that these files are being executed! Alternatively, you can add those files to the blacklist until you are ready to write tests for them, but that will make your coverage look better than it really is if you do eventually want to write tests for those files. Minimally, a test that does nothing but create an instance of a CFC would be enough to trigger its compilation so correct coverage can kick in.
Occasionally you may run across some lines of code in the Code Coverage Browser report that doesn't seem correctly tracked. Common offenders are extra curly braces or ending tags floating on a line of their own. The fact is, mapping each line of CF code to the actual lines of compiled bytecode is tricky business and done entirely by the CF engines (Adobe, Lucee) under the hood during compilation. Sometimes bits of code might not seem tracked correctly, but we've never seen it have any significant effect on your overall coverage data. The behavior is specific to each engine/version but typically lines like that just get associated with the next executable line, so once your coverage for a file hits all the possible lines, the issue goes away :) Feel free to report any issues you see. We have some workarounds in place and can see about making it better.
TestBox's code coverage feature relies on byte code instrumentation from Fusion Reactor. It seems that in some instances this process can fall over due to FR's internal behaviour, byte code class caching, internal compilation changes going from one version of your CFML engine to another one and other reasons. While we report these kind of issues upstream, unfortunately they are nearly impossible for us to properly investigate and debug.
One common symptom seems to be that code coverage statistics for individual files or your overall codebase vary extremely between two TestBox executions without having changed code at all or in a meaningful way. Another symptom observed by users is that code coverage drops to 0% for certain files and you know for sure that these files would be executed during your tests.
A restart of your CFML engine and a subsequent run of your tests with code coverage usually fixes this problem.
MockBox
Create mocks and stubs!
MockBox
Introduction
TestBox includes a mocking and stubbing library we lovingly call MockBox. You don't have to install it or have a separate libary, it is part of TestBox.
MockBox shines by allowing you to create mock and stub objects.
Important Setup
Write capabilities on disk for the default path of /testbox/system/testings/stubs.
You can also choose the directory destination for stub creations yourself when you initialize TestBox. If using ColdFusion 9 or Lucee you can even use ram:// and use the virtual file system.
Useful Resources
What is Mocking?
"A mock object is an object that takes the place of a 'real' object in such a way that makes testing easier and more meaningful, or in some cases, possible at all". by Scott Bain (Emergent DesignThe Evolutionary Nature of Professional Software Development)
Here are some examples of real life mocks to get you in the mocking mood:
When doing unit testing of ColdFusion CFCs, we will come to a point where a single class can have multiple external dependencies or collaborators; whether they are classes themselves, data, external APIs, etc. Therefore, in order to unit test our class exclusively and easily we need to be able to mock this behavior or have full control of this behavior. Remember that unit testing is the testing of software units in isolation. If not, we would be instantiating and creating entire set of components, frameworks, pulling network plugs and so much more ridiculous but functional things just to test one single piece of functionality and/or behavior. So in summary, mock objects are just test oriented replacements for collaborators and dependencies.
Mock objects can also be created by hand, but MockBox takes this pain away by leveraging dynamic techniques so that you can Mock dynamically and at runtime. Like describes in his book:
"Mocks are definitely congruent with the Gang of Four (GoF) notion of designing to interfaces, because a mock is essentially the interface without any real implementation." - Scott Bain (Emergent Design)
You will be leveraging MockBox to create objects that represent your dependencies or even data, decide what methods will return (expectations), mock network connections, exceptions and much more. You can then very easily test the exclusive behavior of components as you will now have control of all expectations, and remember that testing is all about expectations. Also, as your object oriented applications get more complex, mocking becomes essential, but you have to be aware that there are limitations. Not only will you do unit-testing but you will need to expand to do integration testing to make sure the all encompassing behavior is still maintained. However, by using a mocking framework like MockBox you will be able to apply a test-driven development methodology to your unit-testing and be able to accelerate your development and testing. The more you mock, the more you will get a feel for it and find it completely essential when doing unit testing. Welcome to a world where mocking is fun and not frowned upon :)
Directory Runner
This is more of an approach than an actual specifc runner. This approach shows you that you can create a script file in BoxLang (bxs) or in CFML (cfs|cfm) that can in turn execute any test directory with many many runnable configurations. It is very similar to the approach.
The BoxLang language allows you to run your scripts via the CLI or the browser if you have a web server attached to your project.
If you want to run it in the CLI, then just use:
If you want to run it via the web server, place it in your /tests/ folder and run it
CFML engines only allow you to run tests via the browser. So create your script, place it in your web accessible /tests
BDD Tests
BDD stands for Behavioral Driven Development. It is a software development process that aims to improve collaboration between developers, testers, and business stakeholders. BDD involves creating automated tests that are based on the expected behavior of the software, rather than just testing individual code components. This approach helps ensure that the software meets the desired functionality and is easier to maintain and update in the future.
In traditional xUnit, you focused on every component's method individually. In BDD, we will focus on a feature or story to complete, which could include testing many different components to satisfy the criteria. TestBox allows us to create these types of texts with human-readable functions matching our features/stories and expectations.
Suite Groups
As we have seen before, the describe() function describes a test suite of related specs in a test bundle CFC. The title of the suite is concatenated with the title of a spec to create a full spec's name which is very descriptive. If you name them well, they will read out as full sentences as defined by style.
Calls to our describe() function can be nested with specs at any level or point of execution. This allows you to create your tests as a related tree of nested functions. Please note that before a spec is executed, TestBox walks down the tree executing each beforeEach() and afterEach() function in the declared order. This is a great way to logically group specs in any level as you see fit.
xUnit Tests
Unit testing is a software testing technique where individual components of a software application, known as units, are tested in isolation to ensure they work as intended. Each unit is a small application part, such as a function or method, and is tested independently from other parts. This helps identify and fix bugs early in the development process, ensures code quality, and facilitates easier maintenance and refactoring. Tools like TestBox allow developers to create and run automated unit tests, providing assertions to verify the correctness of the code.
TestBox supports xUnit style of testing, like in other languages, via the creation of classes and functions that denote the tests to execute. You can then evaluate the test either using or the library included with TestBox.
You will start by creating a test bundle (Usually with the word Test in the front or back), example: UserServiceTest or TestUserService.
Running Code Coverage
In order to use TestBox Code Coverage, you will need TestBox 3.x or higher installed, a licensed installation of and a working test suite. You may have some or all of these already so skip the sections that don't apply to you.
If you don't have FusionReactor installed, you can do so very easily in CommandBox like so:
That's it! All servers you start now will have FusionReactor configured. You can open FusionReactor's web console via the menu item in your server's tray icon. Note, the FusionReactor web admin is not required to get TestBox code coverage.
If you are not using CommandBox for your server, follow the on FusionReactor's website. If you need a license key, please to acquire one. Note they have a 2 week trial you can use.
To get the latest version of TestBox into a new project, you can install it via CommandBox like so:
Continous Integration
(CI) is a development process that requires developers to integrate their code into a shared source code repository (git,svn,mercurial,etc) several times a day, while a monitoring process detects code commits and acts upon those commits. Those actions can be the actual checkout of branches, execution of build processes, quality control, and of course our favorite; automated testing.
TestBox can integrate with all major CI servers as all you need to do is be able to execute your test suites and produce reports. You can see that in our section and .
Decrease the feedback loop
$callLog()
This method is used to retrieve a structure of method calls that have been made on mocked methods of the mock object. This is extermely useful when you want to assert that a certain method was called with the appropriate arguments. Great for testing method calls that save or update data to some kind of persistent storage. Also great to find out what was the state of the data of a call at certain points in time.
Each mocked method is a key in the structure that contains an array of calls. Each array element can have 0 or more arguments that are traced when methods where called with arguments. If they where made with ordered or named arguments, you will be able to know the difference. We recommend dumping out the structure to check out its composition.
Examples:
$throws() Method
This method is used to tell MockBox that you want to mock a method with to throw a specific exception. The exception will be thrown instead of the method returning results. This is an alternative to passing the exception in the initial $() call. In addition to the fluent API, the $throws() method also has the benefit of being able to be tied to specific $args() in a mocked object.
To continue with our getKey() example:
We want to test that keys that don't exists throw a MissingSetting exception. Let's do that using the $throws()
$atMost()
This method can help you verify that at most a maximum number of calls have been made to all mocked methods or a specific mocked method.
Parameters:
maxNumberOfInvocations - The max number of calls to assert
methodName - The optional method name to assert the number of method calls
$args() Method
This method is used to tell MockBox that you want to mock a method with a SPECIFIC number of argument calls. Then you will have to set the return results for it, but this is absolutely necessary if you need to test an object that makes several method calls to the same method with different arguments, and you need to mock different results coming back. Example, let's say you are using a ColdBox configuration bean that holds configuration data. You make several calls to the getKey() method with different arguments:
How in the world can I mock this? Well, using the mock arguments method.
Hint So remember that if you use the $args() call, you need to tell it what kind of results you are expecting by calling the $results() method after it or you might end up with an exception.
$once()
This method can help you verify that only ONE mocked method call has been made on the entire mock or a specific mocked method. Useful alias!
Parameters:
methodName - The optional method name to assert the number of method calls
Examples:
$results() Method
This method can only be used in conjunction with $() as a chained call as it needs to know for what method are the results for.
The purpose of this method is to make a method return more than 1 result in a specific repeating sequence. This means that if you set the mock results to be 2 results and you call your method 4 times, the sequence will repeat itself 1 time. MUMBO JUMBO, show me!! Ok Ok, hold your horses.
As you can see, the sequence repeats itself once the call counter increases. Let's say that you have a test where the first call to a user object's isAuthorized() method is false but then it has to be true. Then you can do this:
$property() Method
This method is used in order to mock an internal property on the target object. Let's say that the object has a private property of userDAO that lives in the variables scope and the lifecycle for the object is controlled by its parent, in this case the user service. This means that this dependency is created by the user service and not injected by an external force or dependency injection framework. How do we mock this? Very easily by using the $property() method on the target object.
Parameters:
propertyName - The name of the property to mock
$querySim() Method
This method is NOT injected into mock objects but avaialble via MockBox directly in order to create queries very quickly. This is a great way to simulate cfquery calls, cfdirectory or any other cf tag that returns a query.
Type
Description
displayName
false
--
string
If used, this will be the name of the test suite in the reporters.
asyncAll
false
false
boolean
If true, it will execute all the test methods in parallel and join at the end asynchronously.
labels
false
---
string/list
The list of labels this test belongs to
skip
false
false
boolean/udf
A boolean flag that makes the runners skip the test for execution. It can also be the name of a UDF in the same CFC that will be executed and MUST return a boolean value.
Adobe incorrectly calculates coverage for files which did not run at all
Why didn't this ending curly brace, etc get tracked correctly?
My coverage statistics all of a sudden show 0% or weird numbers for code I know that is runnning
Example
You can have as many annotated methods as you would like. TestBox discovers them up the inheritance chain and calls them in reverse order.
describe( "Tests of TestBox behaviour", () => {
it( "rejects 5 as being between 1 and 10", () => {
expect( () => {
expect( 5 ).notToBeBetween( 1, 10 );
} ).toThrow();
} );
it( "rejects 10 as being between 1 and 10", () => {
expect( () => {
expect( 10 ).notToBeBetween( 1, 10 );
} ).toThrow();
} );
} );
feature( "Given-When-Then test language support", () => {
scenario( "I want to be able to write tests using Given-When-Then language", () => {
given( "I am using TestBox", () => {
when( "I run this test suite", () => {
then( "it should be supported", () => {
expect( true ).toBe( true );
} );
} );
} );
} );
} );
story( "I want to list all authors", () => {
given( "no options", () => {
then( "it can display all active system authors", () => {
var event = this.get( "/cbapi/v1/authors" );
expect( event.getResponse() ).toHaveStatus( 200 );
expect( event.getResponse().getData() ).toBeArray().notToBeEmpty();
event
.getResponse()
.getData()
.each( function( thisItem ){
expect( thisItem.isActive ).toBeTrue( thisItem.toString() );
} );
} );
} );
given( "isActive = false", () => {
then( "it should display inactive users", () => {
var event = this.get( "/cbapi/v1/authors?isActive=false" );
expect( event.getResponse() ).toHaveStatus( 200 );
expect( event.getResponse().getData() ).toBeArray().notToBeEmpty();
event
.getResponse()
.getData()
.each( function( thisItem ){
expect( thisItem.isActive ).toBeFalse( thisItem.toString() );
} );
} );
} );
given( "a search criteria", () => {
then( "it should display searched users", () => {
var event = this.get( "/cbapi/v1/authors?search=tester" );
expect( event.getResponse() ).toHaveStatus( 200 );
expect( event.getResponse().getData() ).toBeArray().notToBeEmpty();
} );
} );
} );
describe("A spec", function() {
it("is just a closure, so it can contain any code", function() {
coldbox = 0;
coldbox++;
expect( coldbox ).toBe( 1 );
});
it("can have more than one expectation", function() {
coldbox = 0;
coldbox++;
expect( coldbox ).toBe( 1 );
expect( coldbox ).toBeTrue();
});
});
security = getMockBox().createMock("model.security");
//Call methods on it that perform something, but mock the saveUserState method, it returns void
security.$("saveUserState");
//get the call log for this method
userStateLog = security.$callLog().saveUserState;
expect( arrayLen(userStateLog) eq 0 ).toBeTrue();
Boolean $once([methodname])
// let's say we have a service that verifies user credentials
// and if not valid, then tries to check if the user can be inflated from a cookie
// and then verified again
function verifyUser(){
if( isValidUser() ){
log.info("user is valid, doing valid operations");
}
// check if user cookie exists
if( isUserCookieValid() ){
// inflate credentials
inflateUserFromCookie();
// Validate them again
if( NOT isValidUser() ){
log.error("user from cookie invalid, aborting");
}
}
}
// Now the test
it( "can verify a user", function(){
security = getMockBox().createMock("model.security").$("isValidUser",false);
security.storeUserCookie("valid");
security.verifyUser();
expect( security.$once("isValidUser") ).toBeTrue();
});
function testGetUsers(){
// Mock a query
mockQuery = mockBox.querySim("id,fname,lname
1 | luis | majano
2 | joe | louis
3 | bob | lainez");
// tell the dao to return this query
mockDAO.$("getUsers", mockQuery);
}
Hint Remember that the $throws() call must be chained to a $() or a $args() call.
configBean.getKey('DebugMode'); // Exists
configBean.getKey('OutgoingMail'); // Exists
configBean.getKey('IncmingMail'); // Does not exist (see the typo?)
// get a mock config bean
mockConfig = getMockBox().createEmptyMock( "coldbox.system.beans.ConfigBean" );
// mock the method with args
mockConfig.$( "getKey" ).$args( "debugmode" ).$results( true );
mockConfig.$( "getKey" ).$args( "OutgoingMail" ).$results( "[email protected]" );
// Here's the new $throw call
mockConfig.$( "getKey" ).$args( "IncmingMail" ).$throws( type = "MissingSetting" );
// Then you can call and get the expected results
expect( function(){
mockConfig.getKey( "IncmingMail" );
} ).toThrow( "MissingSetting" );
// let's say we have a service that verifies user credentials
// and if not valid, then tries to check if the user can be inflated from a cookie
// and then verified again
function verifyUser(){
if( isValidUser() ){
log.info("user is valid, doing valid operations");
}
// check if user cookie exists
if( isUserCookieValid() ){
// inflate credentials
inflateUserFromCookie();
// Validate them again
if( NOT isValidUser() ){
log.error("user from cookie invalid, aborting");
}
}
}
// Now the test
it( "can verify a user", function(){
security = createMock("model.security").$("isValidUser",false);
security.storeUserCookie("valid");
security.verifyUser();
// Asserts that isValidUser() has been called at most 1 times
expect( security.$atMost(1,"isValidUser") ).toBeFalse();
});
If the method you are mocking is called using named arguments then you can mock this using:
//get a mock config bean
mockConfig = getMockBox().createEmptyMock("coldbox.system.beans.ConfigBean");
//mock the method for positional arguments
mockConfig.$("getKey").$args("debugmode").$results(true);
mockConfig.$("getKey").$args("OutgoingMail").$results('[email protected]');
//Then you can call and get the expected results
//get a mock config bean
mockConfig = getMockBox().createEmptyMock("coldbox.system.beans.ConfigBean");
//mock the method for named arguments
mockConfig.$("getKey").$args(name="debugmode").$results(true);
propertyScope - The scope where the property lives in. The default is variables scope.
mock - The object or data to inject and mock
Not only can you mock properties that are objects, but also mock properties that are simple/complex types. Let's say you have a property in your target object that controls debugging and by default the property is false, but you want to test the debugging capabilities of your class. So we have to mock it to true now, but the property exists in variables.instance.debugMode? No problem mate (Like my friend Mark Mandel says)!
any $property(string propertyName, [string propertyScope='variables'], any mock)
//decorate our user service with mocking capabilities, just to show a different approach
userService = getMockBox().prepareMock( createObject("component","model.UserService") );
//create a mock dao and mock the getUsers() method
mockDAO=getMockBox().createEmptyMock("model.UserDAO").$("getUsers",QueryNew(""));
//Inject it as a property of the user service, since no external injections are found. variables scope is the default.
userService.$property(propertyName="userDAO",mock=mockDAO);
//Test a user service method that uses the DAO
results = userService.getUsers();
assertTrue( isQuery(results) );
component
extends="testbox.system.BaseSpec"
hint="This is an example of a TestBox BDD test bundle containing dynamically-defined suites."
{
/*
* Need to do config for *dynamic* test suites here, in the
* pseudo-constructor, versus in `beforeAll()`.
*/
doDynamicSuiteConfig();
/*
* @hint This method is arbitrarily named, but it sets up
* metadata needed by the dynamic suites example. The setup
* could have been done straight in the pseudo-constructor,
* but it might be nice to organize it into such a method
* as this.
*/
function doDynamicSuiteConfig(){
variables.dynamicSuiteConfig = ["foo","bar","baz"];
}
function run( testResults, testBox ){
/*
* @hint Dynamic Test Suites Example
*/
// loop over test metadata
for ( var thing in dynamicSuiteConfig ) {
describe("Dynamic Suite #thing#", function(){
// notice how data is passed into the it() closure:
// * data={ keyA=valueA, keyB=ValueB }
// * function( data )
it( title=thing & "test",
data={ thing=thing },
body=function( data ) {
var thing = data.thing;
expect( thing ).toBe( thing );
});
});
}
}
}
component extends="DBTestCase"{
/**
* @beforeEach
*/
function setupColdBox() {
setup();
}
function run() {
given( "I have a two posts", function(){
when( "I visit the home page", function(){
then( "There should be two posts on the page", function(){
queryExecute( "INSERT INTO posts (body) VALUES ('Test Post One')" );
queryExecute( "INSERT INTO posts (body) VALUES ('Test Post Two')" );
var event = execute( event = "main.index", renderResults = true );
var content = event.getCollection().cbox_rendered_content;
expect(content).toMatch( "Test Post One" );
expect(content).toMatch( "Test Post Two" );
});
});
});
}
}
function testAwesomenewss(){
$assert.isAwesome( 'TestBox' );
}
describe("A spec", function() {
beforeEach(function( currentSpec ) {
coldbox = 22;
application.wirebox = new coldbox.system.ioc.Injector();
});
afterEach(function( currentSpec ) {
coldbox = 0;
structDelete( application, "wirebox" );
});
it("is just a function, so it can contain any code", function() {
expect( coldbox ).toBe( 22 );
});
it("can have more than one expectation and talk to scopes", function() {
expect( coldbox ).toBe( 22 );
expect( application.wirebox.getInstance( 'MyService' ) ).toBeComponent();
});
describe("nested inside a second describe", function() {
beforeEach(function( currentSpec ) {
awesome = 22;
});
afterEach(function( currentSpec ) {
awesome = 22 + 8;
});
it("can reference both scopes as needed ", function() {
expect( coldbox ).toBe( awesome );
});
});
it("can be declared after nested suites and have access to nested variables", function() {
expect( awesome ).toBe( 30 );
});
});
component labels="disk,os" extends="testbox.system.BaseSpec" {
/*********************************** LIFE CYCLE Methods ***********************************/
function beforeTests(){
application.salvador = 1;
}
function afterTests(){
structClear( application );
}
function setup(){
request.foo = 1;
}
function teardown(){
structDelete( request, "foo" );
}
/*********************************** Test Methods ***********************************/
function testFloatingPointNumberAddition() output="false"{
var sum = 196.4 + 196.4 + 180.8 + 196.4 + 196.4 + 180.8 + 609.6;
// sum.toString() outputs: 1756.8000000000002
// debug( sum );
// $assert.isEqual( sum, 1756.8 );
}
function testIncludes(){
$assert.includes( "hello", "HE" );
$assert.includes( [ "Monday", "Tuesday" ], "monday" );
}
function testIncludesWithCase(){
$assert.includesWithCase( "hello", "he" );
$assert.includesWithCase( [ "Monday", "Tuesday" ], "Monday" );
}
function testnotIncludesWithCase(){
$assert.notincludesWithCase( "hello", "aa" );
$assert.notincludesWithCase( [ "Monday", "Tuesday" ], "monday" );
}
function testNotIncludes(){
$assert.notIncludes( "hello", "what" );
$assert.notIncludes( [ "Monday", "Tuesday" ], "Friday" );
}
function testIsEmpty(){
$assert.isEmpty( [] );
$assert.isEmpty( {} );
$assert.isEmpty( "" );
$assert.isEmpty( queryNew( "" ) );
}
function testIsNotEmpty(){
$assert.isNotEmpty( [ 1, 2 ] );
$assert.isNotEmpty( { name : "luis" } );
$assert.isNotEmpty( "HelloLuis" );
$assert.isNotEmpty(
querySim(
"id, name
1 | luis"
)
);
}
function testSkipped() skip{
$assert.fail( "This Test should fail" );
}
run.bxs
// Run all the specs in the tests.specs directory and subdirectories
r = new testbox.system.TestBox( directory="tests.specs" )
println( r.run() )
// Run all the specs in the tests.specs directory ONLY
r = new testbox.system.TestBox(
directory={
mapping="tets.specs",
recurse=false
} )
println( r.run() )
// Run all the specs in the tests.specs directory and subdirectories using
// a custom lambda filter
r = new testbox.system.TestBox(
directory={
mapping : "tets.specs",
filter : path -> findNoCase( "test", arguments.path ) ? true : false
}) >
println( r.run() )
// Run all the specs in the tests.specs directory and subdirectories using
// a custom lambda filter and create a JSON report
r = new testbox.system.TestBox(
directory={
mapping="tets.specs",
filter : path -> findNoCase( "test", arguments.path ) ? true : false
}) >
fileWrite( 'testreports.json', r.run() )
println( "JSON report created" )
<cfset r = new testbox.system.TestBox( directory="tests.specs" ) >
<cfoutput>#r.run()#</cfoutput>
<cfset r = new testbox.system.TestBox(
directory={
mapping="tets.specs",
recurse=false
}) >
<cfoutput>#r.run()#</cfoutput>
<cfset r = new testbox.system.TestBox(
directory={
mapping="tets.specs",
recurse=true,
filter=function(path){
return ( findNoCase( "test", arguments.path ) ? true : false );
}
}) >
<cfoutput>#r.run()#</cfoutput>
<cfset r = new testbox.system.TestBox(
directory={
mapping="tets.specs",
recurse=true,
filter=function(path){
return ( findNoCase( "test", arguments.path ) ? true : false );
}
}) >
<cfset fileWrite( 'testreports.json', r.run() )>
//decorate the cache object with mocking capabilties
cache = getMockBox().createMock(object=createObject("component","MyCache"));
//mock the debug property
cache.$property(propertyName="debugMode",propertyScope="instance",mock=true);
The --saveDev flag will store TestBox as a development dependency.
If you don't have test suite yet, let's install a ColdBox sample app to play with. TestBox does not require ColdBox to work, but the mechanics of the test runner itself are identical so this is the easiest way to get one running. Run these CommandBox commands in an empty directory.
Inside your directory will be a folder called /tests which has our test runner /tests/runner.cfm. You will need to open your runner.cfm and default code coverage enabled to true.
All you need to do now is run your test suite. You can do so by hitting /tests/runner.cfm in the URL of your browser, or use the testbox run command in CommandBox.
You don't need to configure anything for code coverage to work. TestBox will auto-detect if FusionReactor is installed on your server and will generate the code coverage results for you. In the output of your test reporter, you will see a percentage to represents the number of lines of code (LOC) which were executed divided by the total number of lines of code. Note, code coverage only counts executable lines of code against you, so comments, whitespace, or HTML do not count as an executable LOC.
Keep reading in the next section to find out how to configure the details of code coverage to only look at the files you want and also how to generate the Code Coverage Browser.
TestBox tests can be run from different sources from what we call Runners. These can be from different sources:
CLI
TestBox CLI (Powered by CommandBox)
BoxLang Scripts
NodeJS
Web Server
Runner
TestBundle Directly
Custom
Your test harness already includes the web runner: runner.bx or runner.cfm. You can execute that directly in your browser to get the results or run it via the CLI: testbox run. We invite you to explore the different runners available to you.
However, you can create your own custom runners as long as you instantiate the TestBox class and execute one of it's runnable methods. The main execution methods are:
Here are the arguments you can use for initializing TestBox or executing the run() method
The bundles argument which can be a single CFC path or an array of CFC paths or a directory argument so it can go and discover the test bundles from that directory.
The reporter argument can be a core reporter name like: json,xml,junit,raw,simple,dots,tap,min,etc or it can be an instance of a reporter CFC.
BoxLang CLI Runner
TestBox ships with a new BoxLang CLI runner for Linux/Mac and Windows. This will allow you to execute your tests from the CLI and, in the future, via VSCode easily and extremely fast. It can also execute and stream the executions so you can see the testing progress when running in verbose mode. The runner can also execute specs/tests that are written in CFML or BoxLang in the BoxLang runtime.
Please note that this is a BoxLang-only feature.
BoxLang allows you to not only build web applications, but CLI, serverless, Android, etc. You can use this runner to test each environment. However, please note that if you will be doing web server testing from the CLI only, you will need to install the web support module into the Operating System runtime.
Web Server Testing
If you want to test from the CLI your web application with no web server, then you will need to install the bx-web-support module into the CLI. Remember that BoxLang is multi-runtime, and you not only can build web applications but CLI or OS based applications.
// CommandBox
install bx-web-support
// BoxLang OS Binary
install-bx-module bx-web-support
This will add web support to the CLI (BIFS, components, etc.) and a mock HTTP server so you can do full life-cycle testing from the CLI like if running your app in a web server. This runner does not require a web server to function, thus if you are building a web app, you will need this module if you still want to continue to execute your tests in the CLI Runtime.
The scripts are located in the following directory: /testbox/bin from the TestBox installation package.
run - For Linux/Mac
run.bat - For Windows
This is the entry point for executing tests at the CLI level. Please note that the test execution does NOT involve a web server. This is for pure CLI testing.
The runner must be run from the root of your BoxLang project:
--bundles A list of test bundles to run, defaults to *, ex: path.to.bundle1,path.to.bundle2, . Mutually exclusive with --directory
--bundles-pattern A pattern to match test bundles defaults to "*Spec*.cfc|*Test*.cfc|*Spec*.bx|*Test*.bx"
--directory A list of directories to look for tests to execute. Please use dot-notation, not absolute notation. Mutually exclusive with
--reporter The reporter to use.
--reportpath : The path to write the report file, defaults to the /tests/results folder by convention
--properties-summary : Generate a properties file with the summary of the test results, defaults to true.
--labels : A list of labels to run, defaults to *
--excludes : A list of labels to exclude, defaults to empty
--filter-bundles : A list of bundles to filter by, defaults to *
A test suite in TestBox is a collection of specifications that model what you want to test. As we will investigate, the way the suite is expressed can be of many different types.
Test suite is a container that has a set of tests which helps testers in executing and reporting the test execution status.
A test suite begins with a call to our TestBox describe() function with at least two arguments: a title and a body function/closure. The title is the name of the suite to register and the body function/closure is the block of code that implements the suite.
When applying BDD to your tests, this function is used to describe your story scenarios that you will implement.
There are more arguments, which you can see below:
Given-When-Then Blocks
Given-When-Then is a style of writing tests where you describe the state of the code you want to test (Given), the behavior you want to test (When) and the expected outcome (Then). (See Specification By Example)
Testbox supports the use of function names given() and when() in-place of describe() function calls. The then() function call is an alternative for it() function calls. The advantage of this style of is that you can gather your requirements and write your tests in a common language that can be understood by developers and stake-holders alike. This common language format is often referred to as the language; using it we can gather and document the requirements as:
TestBox provides you with feature(), scenario() and story() wrappers for describe() blocks. As such we can write our requirements in test form like so:
The output from running the test will read as the original requirements, providing you with not only automated tests but also a living document of the requirements in a business-readable format.
If you prefer to gather requirements as then you may prefer to take advantage of the story() wrapper for describe() instead.
As feature(), scenario() and story() are wrappers for describe() you can intermix them so that your can create tests which read as the business requirements. As with describe(), they can be nested to build up blocks.
Skipping Specs and Suites
Specs and suites can be skipped from execution by prefixing certain functions with the letter x or by using the skip argument in each of them or by using the skip( message, detail ) function. The reporters will show that these suites or specs were skipped from execution. The functions you can prefix are:
it()
describe()
story()
given()
when()
then()
feature()
Here are some examples:
The skip argument can be a boolean value or a closure. If the value is true then the suite or spec is skipped. If the return value of the closure is true then the suite or spec is skipped. Using the closure approach allows you to dynamically at runtime figure out if the desired spec or suite is skipped. This is such a great way to prepare tests for different CFML engines.
You can now use the skip( message, dteail ) method to skip any spec or suite a-la-carte instead of as an argument to the function definitions. This lets you programmatically skip certain specs and suites and pass a nice message.
Skipping Tests and Suites
Tests and suites can be skipped from execution by using the skip annotation in the component or function declaration or our skip() methods. The reporters will show that these suites or tests where skipped from execution.
Skip Annotation
The skip annotation can have the following values:
nothing - If you just add the annotation, we will detect it and skip the test
true - Skips the test
false - Does not skip the test
{udf_name} - It will look for a UDF with that name, execute it and the value must evalute to boolean.
You can also skip manually by using the skip() method in the Assertion library and also in any bundle which is inherited by the BaseSpec class.
You can use the $assert.skip( message, detail ) method to skip any spec or suite a-la-carte instead of as an argument to the function definitions. This lets you programmatically skip certain specs and suites and pass a nice message.
The BaseSpec has this method available to you as well.
Output Utilities
Tests Output Utilities
Sometimes you will need to produce output from your tests and you can do so elegantly via some functions we have provided that are available in your test bundles:
Method
Comment
console()
Send output to the system console
debug()
These are great little utilities that are needed to send output to several locations from within your tests.
Sometimes you need to dump something that is in the CFC you are testing or maybe an asynchronous test. The aforementioned methods are only accessible from your test bundle, so getting to the TestBox output utilities is not easy.
Since version 4.0 we have implemented the testing utilities into the request scope as request.testbox. Which will give you access to all the same output utilities:
Reporters
TestBox comes also with a nice plethora of reporters:
ANTJunit : A specific variant of JUnit XML that works with the ANT junitreport task
Codexwiki : Produces MediaWiki syntax for usage in Codex Wiki
Console : Sends report to console
Doc : Builds semantic HTML to produce nice documentation
Dot : Builds an awesome dot report
JSON : Builds a report into JSON
JUnit : Builds a JUnit compliant report
Min : A minimalistic view of your test reports
MinText : A minimalistic text report
Raw : Returns the raw structure representation of the testing results
Simple : A basic HTML reporter
Tap : A test anything protocol reporter
Text : Back to the 80's with an awesome text report
XML : Builds yet another XML testing report
To use a specific reporter append the reporter variable to the url string. ex &reporter=Text or set it in your runner.cfm
The simple reporter allows you to set a code editor of choice so it can create links for stack traces and tag contexts. It will then open your exceptions and traces in the right editor at the right line number.
To change the editor of choice use the url.editor parameter which you can send in via the url or set it in your runner.cfm
The available editors are:
atom
emacs
espresso
Mocking Methods
Come mock with me!
Once you have created a mock object, you can use it like the real object, which will respond exactly as it was coded. However, you can override its behavior by using the mocking methods placed on the mocked object at run-time. The methods that you can call upon in your object are the following (we will review them in detail later):
Method Name
Return Type
Description
$()
Object
Verification Methods
The following methods are also mixed in at run-time into mock objects and they will be used to verify behavior and calls from these mock/stub objects. These are great in order to find out how many mocked methods calls have been made and to find out the arguments that where passed to each mocked method call.
Method Name
Return Type
Description
$count([methodName])
Numeric
$times() or $verifyCallCount()
This method is used to assert how many times a mocked method has been called or ANY mocked method has been called.
Boolean $times(numeric count, [methodname])
Parameters:
count - The number of times any method or a specific mocked method has been called
methodName - The optional method name to assert the number of method calls
Examples
Installation
Get up and running quickly
TestBox can be installed via as a development dependency in the root of your projects:
The only requirement is that it be in either in the webroot or in a location where you create a /testbox mapping to it's folder.
Language (Our preference)
CFML Engines: Lucee 5.x+ or ColdFusion 2018+
Custom Reporters
You can also build your own reporters by implementing our core interface: testbox.system.reporters.IReport
Once you implement your own report you just need to pass the class path or the instance of your reporter to the TestBox runner methods using the reporter argument. The reporter argument can be the following values:
string - The class path of your reporter
$() Method
This is the method that you will call upon in order to mock a method's behavior and return results. This method has the capability of mocking a return value or even making the method throw a controlled exception. By default the mocked method results will be returned all the time the method is called. So if the mocked method is called twice, the results will always be returned.
Parameters:
method - The method you want to mock or spy on
Used to mock a method on the mock object that can return, throw or be a void method.
$args()
Object
Mock 1 or more arguments in sequential or named order. Must be called concatenated to a $() call and must be followed by a concatenated $results() call so the results are matched to specific arguments.
$getProperty(name, scope)
any
Retrieve any public or private internal state variable so you can do assertions and more mocking.
$property()
Object
Mock a property in the object on any scope.
querySim()
query
to denote columns. Ex: id, name 1 Luis Majano 2 Joe Louis
$results()
Object
Mock 1 or more results of a mock method call must be chained to a $() or $().$args() call
$spy( method )
Object
Spy on a specific method to check how often it has been called and with what arguments and results.
$throws(
type,
message,
datail,
errorcode
)
Object
This method tells MockBox that you want to mock a method that will throw an exception when called.
Get the number of times all mocked methods have been called on a mock or pass in a method name and get a the method's call count.
$times(count,[methodName]) or $verifyCallCount(count,[methodName])
Numeric
Assert how many calls have been made to the mock or a specific mock method
$never([methodName])
Boolean
Assert that no interactions have been made to the mock or a specific mock method: Alias to $times(0)
$atLeast(minNumberOfInvocations,[methodName])
Boolean
Assert that at least a certain number of calls have been made on the mock or a specific mock method
$once([methodName])
Boolean
Assert that only 1 call has been made on the mock or a specific mock method
$atMost(maxNumberOfInvocations, [methodName])
Boolean
Assert that at most a certain number of calls have been made on the mock or a specific mock method.
$callLog()
struct
Retrieve the method call logger structure of all mocked method calls.
$reset()
void
Reset all mock counters and logs on the targeted mock.
$debug()
struct
Retrieve a structure of mocking debugging information about a mock object.
You can execute the runners from any cfm template or any CFC or any URL, that is up to you.
Custom Runners
We encourage you to read the API docs included in the distribution for the complete parameters for each method.
--recurse : Recurse into subdirectories, defaults to true
--eager-failure : Fail fast, defaults to false
--verbose : Verbose output defaults to false. This will stream the output of the status of the tests as they run.
--runner-options: A JSON struct literal of options to pass into the test runner. Ex: {"verbose"=true}
--properties-filename : The name of the properties file to generate defaults to TEST.properties
--write-report : Write the report to a file in the report path folder, defaults to true
--write-json-report : Write the report as JSON alongside the requested report, defaults to false
--write-visualizer : Write the visualizer to a file in the report path folder, defaults to false
--filter-suites : A list of suites to filter by, defaults to *
--filter-specs : A list of test names or spec names to filter by, defaults to *
If you are building exclusively a web application, we suggest you use the CommandBox runner which will call your runner via HTTP from the CLI. You can also just use the Web Runner.
Script Locations
Examples:
Mac/Linux
Windows Examples:
Execution Options
Reporting Options
Filtering Options
body
true
---
closure/udf
The closure that represents the test suite
labels
false
---
string/array
The list or array of labels this suite group belongs to
asyncAll
false
false
Boolean
If you want to parallelize the execution of the defined specs in this suite group.
skip
false
false
Boolean
A flag or a closure that tells TestBox to skip this suite group from testing if true. If this is a closure it must return boolean.
Argument
Required
Default
Type
Description
title
true
---
string
The describe() function is also aliased with the following names:story(), feature(), scenario(), given(), when()
struct - A structure representing your reporter with the following keys: { type="class_path", options={}. This is mostly used if you want to instantiate and use your reporter with a structure of options.
Now you can init TestBox with your reporter:
Here is a sample reporter for you that generates JSON for the output.
Building Reporters
Executing Your Reporter
Sample Reporter
returns - The results it must return, if not passed it returns void or you will have to do the mockResults() chain
preserveReturnType - If false, the mock will make the returntype of the method equal to ANY
throwException - If you want the method call to throw an exception
throwType - The type of the exception to throw
throwDetail - The detail of the exception to throw
throwMessage - The message of the exception to throw
callLogging - Will add the machinery to also log the incoming arguments to each subsequent calls to this method
preserveArguments - If true, argument signatures are kept, else they are ignored. If true, BEWARE with $args() matching as default values and missing arguments need to be passed too.
callback - A callback to execute that should return the desired results, this can be a UDF or closure. It also receives all caller arguments as well.
throwErrorCode - The error code to throw in the exception
The cool thing about this method is that it also returns the same instance of the object. Therefore, you can use it to chain calls to the object and do multiple mocking of methods all within the same line. Remember that if no returns argument is provided then the return is void
Let's do some samples now
Examples
// Run tests and produce reporter results
testbox.run()
// Run tests and get raw testbox.system.TestResults object
testbox.runRaw()
// Run tests and produce reporter results from SOAP, REST, HTTP
testbox.runRemote()
// Run via Spec URL
http://localhost/tests/spec.cfc?method=runRemote
// Via CommandBox
testbox run
/**
* Run me some testing goodness, this can use the constructed object variables or the ones
* you can send right here.
*
* @bundles The path, list of paths or array of paths of the spec bundle classes to run and test
* @directory The directory to test which can be a simple mapping path or a struct with the following options: [ mapping = the path to the directory using dot notation (myapp.testing.specs), recurse = boolean, filter = closure that receives the path of the class found, it must return true to process or false to continue process ]
* @reporter The type of reporter to use for the results, by default is uses our 'simple' report. You can pass in a core reporter string type or an instance of a testbox.system.reports.IReporter. You can also pass a struct if the reporter requires options: {type="", options={}}
* @labels The list or array of labels that a suite or spec must have in order to execute.
* @excludes The list or array of labels that a suite or spec must not have in order to execute.
* @options A structure of configuration options that are optionally used to configure a runner.
* @testBundles A list or array of bundle names that are the ones that will be executed ONLY!
* @testSuites A list or array of suite names that are the ones that will be executed ONLY!
* @testSpecs A list or array of test names that are the ones that will be executed ONLY!
* @callbacks A struct of listener callbacks or a class with callbacks for listening to progress of the testing: onBundleStart,onBundleEnd,onSuiteStart,onSuiteEnd,onSpecStart,onSpecEnd
* @eagerFailure If this boolean is set to true, then execution of more bundle tests will stop once the first failure/error is detected. By default this is false.
*/
any function run(
any bundles,
any directory,
any reporter,
any labels,
any excludes,
struct options,
any testBundles = [],
any testSuites = [],
any testSpecs = [],
any callbacks = {},
boolean eagerFailure = false
)
function run( testResults, testBox ){
describe("A suite", function(){
it("contains spec with an awesome expectation", function(){
expect( true ).toBeTrue();
});
it("contains spec with a failure expectation", function(){
expect( true ).toBeFalse();
});
});
}
Feature: Box Size
In order to know what size box I need
As a distribution manager
I want to know the volume of the box
Scenario: Get box volume
Given I have entered a width of 20
And a height of 30
And a depth of 40
When I run the calculation
Then the result should be 24000
feature( "Box Size", function(){
describe( "In order to know what size box I need
As a distribution manager
I want to know the volume of the box", function(){
scenario( "Get box volume", function(){
given( "I have entered a width of 20
And a height of 30
And a depth of 40", function(){
when( "I run the calculation", function(){
then( "the result should be 24000", function(){
// call the method with the arguments and test the outcome
expect( myObject.myFunction(20,30,40) ).toBe( 24000 );
});
});
});
});
});
});
story("As a distribution manager, I want to know the volume of the box I need", function() {
given("I have a width of 20
And a height of 30
And a depth of 40", function() {
when("I run the calculation", function() {
then("the result should be 24000", function() {
// call the method with the arguments and test the outcome
expect(myObject.myFunction(20,30,40)).toBe(24000);
});
});
});
});
xdescribe("A spec", function() {
it("was just skipped, so I will never execute", ()=>{
coldbox = 0;
coldbox++;
expect( coldbox ).toBe( 1 );
});
});
describe("A spec", function() {
it("is just a closure, so it can contain any code", ()=>{
coldbox = 0;
coldbox++;
expect( coldbox ).toBe( 1 );
});
xit("can have more than one expectation, but I am skipped", ()=> {
coldbox = 0;
coldbox++;
expect( coldbox ).toBe( 1 );
expect( coldbox ).toBeTrue();
});
it( "can only run on lucee", ()=>{
if( !server.keyExists( "lucee" ) ){
skip( "Only for lucee" );
}
} );
});
describe(title="A railo suite", body=function() {
it("can be expected to run", function() {
coldbox = 0;
coldbox++;
expect( coldbox ).toBe( 1 );
});
it(title="can have more than one expectation and another skip closure", body=function() {
coldbox = 0;
coldbox++;
expect( coldbox ).toBe( 1 );
expect( coldbox ).toBeTrue();
},skip=function(){
return false;
});
},skip=function(){
return !structKeyExists( server, "railo" );
});
// Skips ALL the tests if the testEnv() returns TRUE
component displayName="TestBox xUnit suite" skip="testEnv"{
function setup(){
application.wirebox = new coldbox.system.ioc.Injector();
structClear( request );
}
function teardown(){
structDelete( application, "wirebox" );
structClear( request );
}
function betaTest() skip{
...
}
function testThrows() skip="true"{
$assert.throws(function(){
var hello = application.wirebox.getInstance( "myINvalidService" ).run();
});
}
function testNotThrows(){
$assert.notThrows(function(){
var hello = application.wirebox.getInstance( "MyValidService" ).run();;
});
}
private boolean function testEnv(){
return ( structKeyExists( request, "env") && request.env == "stg" ? true : false );
}
}
function testThrows(){
$assert.skip()
$assert.throws(function(){
var hello = application.wirebox.getInstance( "myINvalidService" ).run()
})
}
it( "can use a mocked stub", function(){
// If conditions met, then skip
if( !conditionsMet() ){
skip( "conditions for execution not met" )
}
c = createStub().$( "getData", 4 )
r = calc.add( 4, c.getData() )
expect( r ).toBe( 8 )
expect( c.$once( "getData" ) ).toBeTrue()
} );
console( myResults );
debug( myData );
debug( myData, true );
debug( var=myData, top=5 );
print( "Running This Test with #params.toString()#" );
println( "Running This Test with #params.toString()#" );
request.testbox.console( "I am here" )
request.testbox.debug( "why is this not running" )
interface{
/**
* Get the name of the reporter
*/
function getName();
/**
* Do the reporting thing here using the incoming test results
* The report should return back in whatever format they desire and should set any
* Specifc browser types if needed.
* @results.hint The instance of the TestBox TestResult object to build a report on
* @testbox.hint The TestBox core object
* @options.hint A structure of options this reporter needs to build the report with
*/
any function runReport(
required testbox.system.TestResult results,
required testbox.system.TestBox testbox,
struct options={} );
}
r = new TestBox( reporter="my.path.toCustomReporter" );
r = new TestBox( reporter= new my.path.CustomReporter() );
r = new TestBox( reporter={
type = "my.path.to.CustomReporter",
options = { name = value, name2 = value2 }
} );
component{
function init(){ return this; }
/**
* Get the name of the reporter
*/
function getName(){
return "JSON";
}
/**
* Do the reporting thing here using the incoming test results
* The report should return back in whatever format they desire and should set any
* Specifc browser types if needed.
* @results.hint The instance of the TestBox TestResult object to build a report on
* @testbox.hint The TestBox core object
* @options.hint A structure of options this reporter needs to build the report with
*/
any function runReport(
required testbox.system.TestResult results,
required testbox.system.TestBox testbox,
struct options={}
){
getPageContext().getResponse().setContentType( "application/json" );
return serializeJSON( arguments.results.getMemento() );
}
}
function beforeAll(){
mockUser = createMock("model.security.User");
//Mock several methods all in one shot!
mockUser.$("isFound",false).$("isDirty",false).$("isSaved",true);
}
//make exists return true in a mocked session object
mockSession.$(method="exists",returns=true);
expect(mockSession.exists('whatevermanKey')).toBeTrue();
//make exists return true and then false and then repeat the sequence
mockSession.$(method="exists").$results(true,false);
expect( mockSession.exists('yeaaaaa') ).toBeTrue();
expect( mockSession.exists('nada') ).toBeFalse();
//make the getVar return a mock User object
mockUser = createMock(className="model.User");
mockSession.$(method="getVar",results=mockUser);
expect( mockSession.getVar('sure') ).toBe( mockUser );
//Make the call to user.checkPermission() throw an invalid exception
mockUser.$(method="checkPermission",
throwException=true,
throwType="InvalidPermissionException",
throwMessage="Invalid permission detected",
throwDetail="The permission you sent was invalid, please try again.");
try{
mockUser.checkPermission('invalid');
}
catch(Any e){
if( e.type neq "InvalidPermissionException"){
fail('The type was invalid #e.type#');
}
}
//mock a method with call logging
mockSession.$(method="setVar",callLogging=true);
mockSession.setVar("Hello","Luis");
mockSession.setVar("Name","luis majano");
//dump the call logs
<cfdump var="#mockSession.$callLog()#">
idea
macvim
sublime
textmate
vscode
vscode-insiders
<cfsetting showDebugOutput="false">
<!--- Executes all tests in the 'specs' folder with simple reporter by default --->
<cfparam name="url.reporter" default="simple">
<cfparam name="url.directory" default="tests.specs">
<cfparam name="url.recurse" default="true" type="boolean">
<cfparam name="url.bundles" default="">
<cfparam name="url.labels" default="">
<cfparam name="url.excludes" default="">
<cfparam name="url.reportpath" default="#expandPath( "/tests/results" )#">
<cfparam name="url.propertiesFilename" default="TEST.properties">
<cfparam name="url.propertiesSummary" default="false" type="boolean">
<cfparam name="url.editor" default="vscode">
<!--- Include the TestBox HTML Runner --->
<cfinclude template="/testbox/system/runners/HTMLRunner.cfm" >
Open In Editor (Simple)
The default editor is vscode
Available Editors
Images
Here is a table of what's included in the installation package which goes in /{project}/testbox
Folder
Description
bx
BoxLang tools
cfml
CFML Tools
system
The main system framework folder
In the bx folder you will find specific BoxLang tools:
Folder
Description
browser
This is a little utility to facilitate navigating big testing suites. This helps navigate to the suites you want and execute them instead of typing all the time.
tests
A vanilla test runner for any application
runner
A simple GUI test runner
In the cfml folder you will find specific BoxLang tools:
Folder
Description
browser
This is a little utility to facilitate navigating big testing suites. This helps navigate to the suites you want and execute them instead of typing all the time.
tests
A vanilla test runner for any application
runner
A simple GUI test runner
Now that you are installed, please set up your favorite IDE with our tooling extensions so it can make your testing experience more enjoyable.
TestBox comes with its own CLI for CommandBox. You can use it to generate tests, harnesses, and suites and also run executions from the CLI.
You will now have the testbox namesapce available to you, try it out
Once you install TestBox, you'll need a quick way to set up a testing harness in your project. The generate harness command will add a new /tests folder to your application with a few example tests to get you started.
/tests - The test harness generated
/resources - Where you can place any kind of testing helpers, data, etc
/specs - Where your test bundles can go
/unit
/integration
Application.bx|cfc - Your test harness applilcation file. Controls life-cycle and application concerns.
runner.bx|cfm - A web runner template that executes ALL your tests with tons of different options from a running web server.
test.xml - An ANT task to do JUNIT testing.
You can then run your tests by executing the testbox run command in CommandBox or by visiting the web runner in the generated harness: http://localhost/tests/runner.cfm
You can also use the CLI to generate tests according to your style and also it detects if you are using BoxLang or a CFML engine.
If you want to be explicit you can use the language id to set it to your preferred language for generation and usage. We recommend this so all CLI tooling can detect what language your project is in.
// Create a new project
mkdir myProject --cd
// latest stable version
box install testbox --saveDev
// latest bleeding edge
box install testbox@be --saveDev
Framework
Please note the --saveDev flag, which tells CommandBox that TestBox is a development dependency and not a production dependency.
By default, code coverage will track all .cfc and .cfm files in your web root. However, for the most correct numbers, you want to only track the code in your app. This means you'll want to ignore things like
3rd party frameworks such as ColdBox or TestBox itself
3rd party modules installed by CommandBox (i.e., your /modules folder)
Backups or build directories that aren't actually part of your app
Parts of the app that you aren't testing such as the /tests folder itself
Most of the coverage settings are devoted to helping TestBox know what files to track, but there are some other ones too. Let's review them.
Code coverage is enabled by default and set with a default configuration. You can control how it behaves with a series of <CFParam> tags in your /tests/runner.cfm file. If you created a fresh new ColdBox app from our app templates using coldbox create app, you'll see there are already configuration options ready for you to change. If you are working with an existing test suite runner, place the following lines PRIOR to the <CFInclude> in your runner.cfm.
Let's go over the options above and what they do. Feel free to comment/uncomment and modify them as you need for your code. Note, any of these settings can be overridden by a URL variable as well.
Set this to true or false to enable the code coverage feature of TestBox. This setting will default to true if TestBox detects that you have FusionReactor installed, false otherwise. Setting this to true without FusionReactor installed will be ignored.
The following setting would turn off code coverage:
Use this to point to the root folder that contains code you wish to gather coverage data from. This must be an absolute path and feel free to use any CF Mappings defined in your /tests/Application.cfc to make the path dynamic. This is especially useful if the app being tested is in a subfolder of the actual web root. There is nominal overhead in gathering the coverage data from files, so set this to the correct folder and instead of using the whitelist to filter down from your web root if possible.
This setting defaults to the web root. Also note, code coverage only looks at files ending in .cfc or .cfm so there's no need to filter additionally on that unless you want to only include, say, .cfc files.
This is a comma-delimited list of file globbing patterns relative to the coveragePathToCapture setting that further filters what files and folders to track. By default this setting is empty, which means ALL CFML code in the coverage path will be tracked. As soon as you specify at least one file globbing path in the whitelist, ONLY the files matching the whitelist will be tracked.
For example, if you only cared about handlers and models in an MVC app, you could configure a whitelist of:
Note, all the basic rules of file globbing apply here. To give you a quick review
Use ? to match a single char like /Application.cf?
Use * to match multiple characters within a folder or file like /models/*Service.cfc.
This is a comma-delimited list of file globbing patterns relative to the coveragePathToCapture setting that is applied on top of any whitelist patterns to prune back folders or files you don't want to track. There's no reason to include a path in the blacklist if you have a whitelist specified and that whitelist already doesn't include the path in question. However, a blacklist can be very handy when you want to include everything but a few small exceptions and it's easier to list those exceptions rather than create a large number of paths in the whitelist.
One of the most visually exciting features of Code Coverage is the ability to generate a stand-alone HTML report that allows you inspect every tracked file in your project and see exactly what lines of code are "covered" by your tests and what is not. The Code Coverage Browser is a mini-site of static HTML files in a directory which you can open in a browser on any computer without the need for a CF engine or TextBox being present. (read, you can zip them up and send them to your boss or store as a build artifact!)
To enable the Code Coverage Browser, uncomment the param for it and specify an absolute file path to where you would like the static mini-site created. You will want a dedicated directory such as /tests/results/coverageReport but just remember to expand it so it's absolute. The directory will be created if it doesn't exist.
Also note, Windows is pesky about placing file and folder locks on your report output directory if you have it open in Windows Explorer. If you get an error about not being able to delete the report directory, close all Explorer windows and try again. Sadly, there's no workaround for this as Windows is the one placing the locks!
SonarQube is a code quality tool that gathers information about your code base for further reporting. If you don't use SonarQube, you may ignore this section. You can have TestBox spit out a coverage XML file in the format that SonarQube requires by uncommenting this param and specifying an absolute file path to where you'd like the file written. Please include the file name in the path.
Expectations are self-concatenated strings that evaluate an actual value to an expected value or condition. These are initiated by the global TestBox method called expect() which takes in a value called the actual value or expectAll() which takes in an array or struct which will be the actual value. It is concatenated in our expectations DSL with a matcher function that will most likely take in an expected value or condition to test. You can also concatenate the matchers and do multiple evaluations on a single actual value.
Each matcher implements a comparison or evaluation of the actual value and an expected value or condition. It is responsible for either passing or failing this evaluation and reporting it to TestBox. Each matcher also has a negative counterpart assertion by just prefixing the call to the matcher with a not expression.
Gitlab
is one of the most popular collaboration software suites around. It is not only a CI server, but a source code server, docker registry, issue manager, and much much more. They are our personal favorite for private projects due to their power and flexibility.
All in one tool: CI, repository, docker registry, issues/milestones, etc.
Same as Travis in concept - CI Runner
Creating a Mock Object
In order to create a mock object you need to use any of the following methods: createMock(), createEmptyMock(), or prepareMock().
Used to create a new mock object from scratch or from an already instantiated object.
Parameters:
className - The class name of the object to create and mock
Travis
is one of the most popular CI servers for open source software. At Ortus Solutions, we use it for all of our open source software due to its strength of pull request runners and multi-matrix runners. They have both free and commercial versions, so you can leverage it for private projects as well.
FREE for Open Source Projects
Runs distributed VM’s and Container Support
About This Book
Learn about the authors of TestBox and how to support the project.
The source code for this book is hosted on GitHub: . You can freely contribute to it and submit pull requests. The contents of this book is copyrighted by and cannot be altered or reproduced without the author's consent. All content is provided "As-Is" and can be freely distributed.
Flash, Flex, ColdFusion, and Adobe are registered trademarks and copyrights of Adobe Systems, Inc.
BoxLang, ColdBox, CommandBox, FORGEBOX, TestBox, ContentBox, and Ortus Solutions are all trademarks and copyrights of Ortus Solutions, Corp.
The information in this book is distributed “as is” without warranty. The author and Ortus Solutions, Corp shall not have any liability to any person or entity concerning loss or damage caused or alleged to be caused directly or indirectly by the content of this training book, software, and resources described in it.
We highly encourage contributions to this book and our open-source software. The source code for this book can be found in our
Web Runner
Every test harness comes with a runner.bx or runner.cfm in the root of the tests folder. This is called the web runner and is executable via the web server you are running your application on. This will execute all the tests by convention found in the tests/specs folder.
You can open that file and customize it as you see fit. Here is an example of such a file:
If you make your test bundle class inherit from our testbox.system.BaseSpec class, you will be able to execute the class directly via the URL:
All the arguments found in the runner
Test and Suite Labels
Tests and suites can be tagged with TestBox labels. Labels allows you to further categorize different tests or suites so that when a runner executes with labels attached, only those tests and suites will be executed, the rest will be skipped. Labels can be applied globally to the component declaration of the test bundle suite or granularly at the test method declaration.
$never()
This method is a quick notation for the $times(0) call but more expressive when written in code:
Parameters:
* methodName - The optional method name to assert the number of method calls
Examples:
test-visualizer
A static visualizer of JSON reports. Just drop in a test-results.json and run it!
tests
Several sample tests and runners are actually used to build TestBox
Our Approach and Benefits
The approach that we take with MockBox is a dynamic and minimalistic approach. Why dynamic? Well, because we dynamically transform target objects into mock form at runtime. The API for the mocking factory is very easy to use and provides you a very simplistic approach to mocking.
We even use $()style method calls so you can easily distinguish when using or mocking methods, properties, etc. So what can MockBox do for me?
Create mock objects for you and keep their methods intact (Does not wipe methods, so you can do method spys, or mock helper methods)
Create mock objects and wipe out their method signatures
Create stub objects for objects that don't even exist yet. So you can build to interfaces and later build dependencies.
Decorate instantiated objects with mocking capabilities (So you can mock targeted methods and properties; spys)
Mock internal object properties, basically do property injections in any internal scope
State-Machine Results. Have a method recycle the results as it is called consecutively. So if you have a method returning two results and you call the method 4 times, the results will be recycled: 1,2,1,2
Method call counter, so you can keep track of how many times a method has been called
Method arguments call logging, so you can keep track of method calls and their arguments as they are called. This is a great way to find out what was the payload when calling a mocked method
Ability to mock results depending on the argument signatures sent to a mocked method with capabilities to even provide state-machine results
Ability to mock private/package methods
Ability to mock exceptions from methods or make a method throw a controlled exception
Ability to change the return type of methods or preserve their signature at runtime, extra cool when using stubs that still have no defined signature
Ability to call a debugger method ($debug()) on mocked objects to retrieve extra debugging information about its mocking capabilities and its mocked calls
Use ** to match multiple characters in any sub folder (recursively) like /models/**.cfc.
A pattern like foo will match any file or folder recursively but a leading slash like /foo locks that pattern to the root directory so it's not a recursive match.
A trailing slash forces a directory match like /tests/, but no trailing slash like /tests would also match a file such as /tests-readme.md.
Default Settings
Configuration Options
coverageEnabled
coveragePathToCapture
coverageWhitelist
coverageBlacklist
coverageBrowserOutputDir
coverageSonarQubeXMLOutputPath
component displayName="TestBox xUnit suite" labels="railo,stg,dev"{
function setup(){
application.wirebox = new coldbox.system.ioc.Injector();
structClear( request );
}
function teardown(){
structDelete( application, "wirebox" );
structClear( request );
}
function testThrows(){
$assert.throws(function(){
var hello = application.wirebox.getInstance( "myINvalidService" ).run();
});
}
function testNotThrows(){
$assert.notThrows(function(){
var hello = application.wirebox.getInstance( "MyValidService" ).run();;
});
}
function testFailsShortcut() labels="dev"{
fail( "This Test should fail when executed with labels" );
}
}
TestBox has a plethora (That's Right! I said Plethora) of matchers that are included in TestBox. The best way to see all the latest matchers is to visit our API and digest the testbox.system.Expectation class. There is also the ability to register and write custom matchers in TestBox via our addMatchers() function at runtime.
You can also build and register custom matchers. Please visit the Custom Matchers chapter to read more about custom matchers.
Matchers
Included Matchers
Custom Matchers
are available as well in a direct bundle execution:
labels: The labels to apply to the execution
testMethod : A list or array of xunit test names that will be executed ONLY!
testSuites : A list or array of suite names that are the ones that will be executed ONLY!
testSpecs : A list or array of test names that are the ones that will be executed ONLY!
reporter : The type of reporter to run the test with
Jobs can have dependencies, artifacts, services, etc
Schedule Pipelines (Cron)
Jobs can track environments
Great stats + charting
In order to work with Gitlab you must create a .gitlab-ci.yml file in the root of your project. Once there are commits in your repository, Gitlab will process this file as your build file. Please refer to the Gitlab Pipelines documentation for further study.
We will leverage the Ortus Solutions CommandBox Docker image in order to provide us with the capability to run any CFML engine and to execute tests. Please note that Gitlab runs in a docker environment.
The build file above leverages the ortussolutions/commandbox:alpine image, which is a compact and secure image for CommandBox. We then have a few stages (build,test,deploy), but let's focus on the run_tests job.
We define which branches it should listen to: development, and then we have a script block that defines what to do for this job. Please note that the when action is commented, because we want to execute this job every time there is a commit. In Gitlab we can determine if a job is manual, scheduled, automatic or dependent on other jobs, which is one of the most flexible execution runners around.
In our script we basically install our dependencies for our project using CommandBox and startup a CFML server. We then go ahead and execute our tests via box testbox run.
In order for the box testbox run to execute correctly, our box.json in our project must be able to connect to our server and know which tests to execute. Below are all the possiblities for the testbox integration object in CommandBox's box.json. (See the CommandBox docs for box.json for more details.)
You can look at our cbVue sample application online: https://gitlab.com/lmajano/cbvue which contains all CI server integrations.
image: ortussolutions/commandbox:alpine
stages:
- build
- test
- deploy
build_app:
stage: build
script:
# Install dependencies
- box install production=true
run_tests:
stage: test
only:
- development
# when: manual, always, on_success, on_failure
script:
- box install && box server start
- box testbox run
run_tests:
stage: test
only:
- development
# when: manual, always, on_success, on_failure
script:
- box install && box server start
- box testbox run
{
"name" : "Package Name",
// ForgeBox unique slug
"slug" : "",
// semantic version of your package
"version" : "1.0.0+buildID",
// author of this package
"author" : "Luis Majano <[email protected]>",
// location of where to download the package, overrides ForgeBox location
"location" : "URL,Git/svn endpoint,etc",
// testbox integration
testbox :{
// The location of the runner
runner : [
{ "default": "http://localhost:8080/tests/runner.cfm" }
],
// Which labels to run, empty means all
"labels" : "",
// Which reporter to use, default is json
"reporter" : "",
// Which CFC bundles to execute, default is all
"bundles" : "",
// Which directories to execute
"directory" : "tests.specs",
// Recurse the directories for CFCs
"recurse" : true,
// Which bundles to filter on
"testBundles" : "",
// Which suites to filter on
"testSuites" : "",
// Which specs to filter on
"testSpecs" : "",
// Display extra details inlcuding passing and skipped tests.
"verbose" : true,
// How may milliseconds to wait before polling for changes, defaults to 500 ms
"watchDelay" : 500,
// Command delimited list of file globbing paths to watch relative to the working directory
"watchPaths" : "**.cfc"
}
}
TestBox Integration
Box.json
Online Example: cbVue
object - The instantiated object to add mocking capabilities to, similar to using prepareMock()
clearMethods - If true, all methods in the target mock object will be removed. You can then mock only the methods that you want to mock
callLogging - Add method call logging for all mocked methods only
Used to create a new mock object with all its method signatures wiped out, basically an interface with no real implementation. It will be up to you to mock all behavior.
Parameters:
className - The class name of the object to create and mock
object - The instantiated object to add mocking capabilities to, similar to using prepareMock()
callLogging - Add method call logging for all mocked methods only
Decorate an already instantiated object with mocking capabilities. It does not wipe out the object's methods or signature, it only decorates it (mixes-in methods) with methods for mocking operations. This is great for doing targeted mocking for specific methods, private methods, properties and more.
Parameters:
object - The already instantiated object to prepare for mocking
callLogging - Add method call logging for all mocked methods only
Caution If call logging is turned on, then the mock object will keep track of all method calls to mocked methods ONLY. It will store them in a sequential array with all the arguments the method was called with (named or ordered). This is essential if you need to investigate if a method was called and with what arguments. You can also use this to inspect save or update calls based on mocked external repositories.
Sample:
Let's say that we have a user service layer object that relies on the following objects:
sessionstorage - a session facade object
transfer - the transfer ORM
userDAO - a data access object for complex query operations
We can start testing our user service and mocking its dependencies by preparing it in a test case CFC with the following setup() method:
The service CFC we just injected mocked dependencies:
public any createMock([string CLASSNAME], [any OBJECT], [boolean CLEARMETHODS='false'], [boolean CALLLOGGING='true'])
public any createEmptyMock(string CLASSNAME, [any OBJECT], [boolean CALLLOGGING='true'])
user = mockbox.createEmptyMock("model.User");
public any prepareMock([any OBJECT], [boolean CALLLOGGING='true'])
myService = createObject("component","model.services.MyCoolService").init();
// prepare it for mocking
mockBox.prepareMock( myService );
component extends=”testbox.system.BaseSpec” {
function beforeAll(){
//Create the User Service to test, do not remove methods, just prepare for mocking.
userService = createMock("model.UserService");
// Mock the session facade, I am using the coldbox one, it can be any facade though
mockSession= createEmptyMock(className='coldbox.system.plugins.SessionStorage');
// Mock Transfer
mockTransfer = createEmptyMock(className='transfer.com.Transfer');
// Mock DAO
mockDAO = createEmptyMock(className='model.UserDAO');
//Init the User Service with mock dependencies
userService.init(mockTransfer,mockSession,mockDAO);
}
function run(){
describe( "User Service", function(){
it( "can get data", function(){
// mock a query using mockbox's querysimulator
mockQuery = querySim("id, name
1|Luis Majano
2|Alexia Majano");
// mock the DAO call with this mocked query as its return
mockDAO.$("getData", mockQuery);
data = userService.getData();
expect( data ).toBe( mockQuery );
});
});
}
}
Triggers Build Script via git repository commits (.travis.yml)
Multiple language support
Many integrations and extensions
Many notification types
No ability to schedule/manual builds
Great for open source projects!
In order to work with Travis you must create a .travis.yml file in the root of your project. Once there are commits in your repository, Travis will process this file as your build file. Please refer to the Travis Documentation for further study.
This build file is based on the java language and an Ubuntu Trusty image. We start off by executing the before_install step which installs all the OS dependencies we might need. In our case we add the CommandBox repository server keys and install CommandBox as our dependency. We then move to our install step which makes sure we have all the required software dependencies to execute our tests, again this looks at our box.json for TestBox and required project dependencies. After issuing the box install we move to starting up the CFML engine using box server start and we are ready to test.
The testing occurs in the script block:
In our script we basically install our dependencies for our project using CommandBox and startup a CFML server. We then go ahead and execute our tests via box testbox run.
In order for the box testbox run to execute correctly, our box.json in our project must be able to connect to our server and know which tests to execute. Below are all the possiblities for the testbox integration object in CommandBox's box.json. (See the CommandBox docs for box.json for more details.)
{
"name" : "Package Name",
// ForgeBox unique slug
"slug" : "",
// semantic version of your package
"version" : "1.0.0+buildID",
// author of this package
"author" : "Luis Majano <[email protected]>",
// location of where to download the package, overrides ForgeBox location
"location" : "URL,Git/svn endpoint,etc",
// testbox integration
testbox :{
// The location of the runner
runner : [
{ "default": "http://localhost:8080/tests/runner.cfm" }
],
// Which labels to run, empty means all
"labels" : "",
// Which reporter to use, default is json
"reporter" : "",
// Which CFC bundles to execute, default is all
"bundles" : "",
// Which directories to execute
"directory" : "tests.specs",
// Recurse the directories for CFCs
"recurse" : true,
// Which bundles to filter on
"testBundles" : "",
// Which suites to filter on
"testSuites" : "",
// Which specs to filter on
"testSpecs" : "",
// Display extra details inlcuding passing and skipped tests.
"verbose" : true,
// How may milliseconds to wait before polling for changes, defaults to 500 ms
"watchDelay" : 500,
// Command delimited list of file globbing paths to watch relative to the working directory
"watchPaths" : "**.cfc"
}
}
TestBox Integration
Box.json
Online Example: cbVue
where you can submit pull requests.
15% of the proceeds of this book will go to charity to support orphaned kids in El Salvador - http://www.harvesting.org/. So please donate and purchase the printed version of this book; every book sold can help a child for almost 2 months.
Shalom Children's Home
Shalom Children’s Home (https://www.harvesting.org/) is one of the ministries that are dear to our hearts located in El Salvador. During the 12-year civil war that ended in 1990, many children were left orphaned or abandoned by parents who fled El Salvador. The Benners saw the need to help these children and received 13 children in 1982. Little by little, more children came on their own, churches and the government brought children to them for care, and the Shalom Children’s Home was founded.
Shalom now cares for over 80 children in El Salvador, from newborns to 18 years old. They receive shelter, clothing, food, medical care, education, and life skills training in a Christian environment. The home is supported by a child sponsorship program.
We have personally supported Shalom for over 6 years now; it is a place of blessing for many children in El Salvador who either has no families or have been abandoned. This is a good earth to seed and plant.
TestBox 5.x series is a major bump in our library. Here are the major areas of improvement and the full release notes.
Engine Support
TestBox Engine Support
We have dropped Adobe 2016 support and added support for Adobe 2023 and Lucee 6+
Batch Test Coverage Reporting
TestBox Batch Code Coverage
Due to memory limitations in CI environments, larger codebases cannot run all tests as a single testbox run command. Instead, specs are run in a methodical folder-by-folder sequence, separating the testbox run out over many requests and thus working around the Out-Of-Memory exceptions.
While this works, it prevents accurate code coverage reporting since only a small portion of the tests are executed during any request. The generated code coverage report only shows a tiny fraction of the coverage - say, 2% - and not the whole picture
TestBox 5 introduces a CoverageReporter component which
Runs on every TestBox code coverage execution
Loads any previous coverage data from a JSON file
Combines the previous coverage data with the current execution's coverage data (file by file and line by line)
When setting url.isBatched=true and executing the batched test runner, the code coverage report will grow with each sequential testbox run command.
MockBox now supports a $spy( method ) method that allows you to spy on methods with all the call log goodness but without removing all the methods. Every other method remains intact, and the actual spied method remains active. We decorate it to track its calls and return data via the $callLog() method.
Example of CUT:
Example Test:
We have focused on this release to lazy load everything as much as possible to allow for much better testing performance. Check it out!
You can now use the skip( message ) method to skip any spec or suite a-la-carte instead of as an argument to the function definitions. This lets you programmatically skip certain specs and suites and pass a nice message.
toHaveLength param should be numeric
Element $DEBUGBUFFER is undefined in THIS
Add contributing.md to the repo
full null support automated testing
allows globbing path patterns in test bundles argument
Add CoverageReporter for batching code coverage reports
Ability to spy on existing methods: $spy()
Add development dependencies to box.json
Author
Luis Fernando Majano Lainez
Luis Majano is a Computer Engineer with over 16 years of software development and systems architecture experience. He was born in San Salvador, El Salvador in the late 70’s, during a period of economical instability and civil war. He lived in El Salvador until 1995 and then moved to Miami, Florida where he completed his Bachelors of Science in Computer Engineering at Florida International University. Luis resides in The Woodlands, Texas with his beautiful wife Veronica, baby girl Alexia and baby boy Lucas!
He is the CEO of Ortus Solutions, a consulting firm specializing in web development, ColdFusion (CFML), Java development and all open source professional services under the ColdBox and ContentBox stack. He is the creator of ColdBox, ContentBox, WireBox, MockBox, LogBox and anything “BOX”, and contributes to many open source ColdFusion projects. He is also the Adobe ColdFusion user group manager for the Inland Empire. You can read his blog at www.luismajano.com
Luis has a passion for Jesus, tennis, golf, volleyball and anything electronic. Random Author Facts:
He played volleyball in the Salvadorean National Team at the tender age of 17
The Lord of the Rings and The Hobbit is something he reads every 5 years. (Geek!)
His first ever computer was a Texas Instrument TI-86 that his parents gave him in 1986. After some time digesting his very first BASIC book, he had written his own tic-tac-toe game at the age of 9. (Extra geek!)
He has a geek love for circuits, microcontrollers and overall embedded systems.
He has of late (during old age) become a fan of running and bike riding with his family.
Keep Jesus number one in your life and in your heart. I did and it changed my life from desolation, defeat and failure to an abundant life full of love, thankfulness, joy and overwhelming peace. As this world breathes failure and fear upon any life, Jesus brings power, love and a sound mind to everybody!
“Trust in the LORD with all your heart, and do not lean on your own understanding.”
Proverbs 3:5
Jorge is an Industrial and Systems Engineer born in El Salvador. After finishing his Bachelor studies at the Monterrey Institute of Technology and Higher Education , Mexico, he went back to his home country where he worked as the COO of. In 2012 he left El Salvador and moved to Switzerland in persuit of the love of his life. He married her and today he resides in Basel with his lovely wife Marta and their daughter Sofía.
Jorge started working as project manager and business developer at Ortus Solutions, Corp. in 2013, . At Ortus he fell in love with software development and now enjoys taking part on software development projects and software documentation! He is a fellow Cristian who loves to play the guitar, worship and rejoice in the Lord!
Therefore, if anyone is in Christ, the new creation has come: The old has gone, the new is here!
2 Corinthians 5:17
Test Methods
TestBox discovers test methods in your bundle CFC by applying the following discovery rules:
Any method that has a test annotation on it
Any public method that starts or ends with the word test
// Via inline annotation
function shouldBeAwesome() test{}
/**
* Via comment annotation
* @test
*/
function shouldBeAwesome(){}
// via conventions
function testShouldDoThis(){}
function shouldDoThisTest(){}
Each test method will test the state of the SUT (software under test) or sometimes referred to as code under test. It will do so by asserting that actual values from an execution match an expected value or condition. TestBox offers an assertion library that you have available in your bundle via the injected variable $assert. You can also use our expectations library if you so desire, but that is mostly used in our BDD approach.
Each test function can also have some cool annotations attached to it.
Persists the COMBINED coverage data to a JSON file.
Returns the COMBINED coverage data for the CoverageBrowser.cfc to build as an HTML report
TESTBOX-356 Don't assume TagContext has length on simple reporter
TESTBOX-357notToThrow() incorrectly passes when no regex is specified
TESTBOX-360 full null support not working on Application env test
A boolean flag that makes the runners skip the test for execution. It can also be the name of a UDF in the same CFC that will be executed and MUST return a boolean value.
Argument
Required
Default
Type
Description
labels
false
---
string/list
The list of labels this test belongs to
$spy()
Spy like us!
MockBox now supports a $spy( method ) method that allows you to spy on methods with all the call log goodness but without removing all the methods. Every other method remains intact, and the actual spied method remains active. We decorate it to track its calls and return data via the $callLog() method.
Example of CUT:
void function doSomething(foo){
// some code here then...
local.foo = variables.collaborator.callMe(local.foo);
variables.collaborator.whatever(local.foo);
}
void function doSomething(foo){
// some code here then...
local.foo = variables.collaborator.callMe(local.foo);
variables.collaborator.whatever(local.foo);
}
TestBox is a next-generation testing framework for the BoxLang JVM language and ColdFusion (CFML) language based on BDD (Behavior Driven Development) for providing a clean, obvious syntax for writing tests. It contains not only a testing framework, console/web runner, assertions, and expectations library but also ships with several mocking utilities.
Styles
In TestBox you can write your tests in two different styles or approaches.
BDD (Behavior Driven Development)
BDD stands for behavior-driven development and is highly based on creating specifications and expectations of results in a readable DSL (Domain Specific Language). You are not focusing on a specific unit and method to test, but on functionality, features and more. This can encompass not only unit but also integration testing. You have several methods that you can use in order to denote functionality and specifications:
describe()
feature()
story()
given(), when(), then()
it() or test()
xUnit style of testing is the more traditional TDD or test-driven development approach where you create a test case bundle class that matches the software under test, and for each method in the SUT, you create a test method in the test bundle class.
We also give you two ways to do assertions:
library, which is a traditional approach to assertions
library, which is a more fluent approach to assertions.
Both approaches also offer different callbacks so you can execute code during different times in the test execution.
TestBox will also offer different utilities:
Debug output to a debug buffer
Mock classes, methods and properties
Extension data mocking and JSON mocking
Logging facilities
You can also execute your tests via the CLI, IDE or the web server.
TestBox can produce many different types of reports for your test executions:
CLI / Console Output
VSCode Output
JSON
XML
Here is a few samples:
Writing Tests
Tests are placed inside of classes we lovingly call Test Bundles.
No matter what style you decide to use, you will still end up building a Testing Bundle Class. This class will either containBDD stylesuites and specs or xUnit style method tests. You can create as many as you need and group them as necessary in different folders (packages) according to their features. Our test harness can be generated via the CLI or you can grab it from the installation folder /bx or cfml/test-harness. Here is the typical layout of the harness:
/tests - The test harness
/resources - Where you can place any kind of testing helpers, data, etc
/specs - Where your test bundles can go
Application.bx|cfc - Your test harness applilcation file. Controls life-cycle and application concerns.
runner.bx|cfm - A web runner template that executes ALL your tests with tons of different options from a running web server.
test.xml - An ANT task to do JUNIT testing.
You will be creating test classes inside the /tests/specs folders. The class can extend our base class: testbox.system.BaseSpec or not. If you do, then the tests will be faster, executable directly from a web server and you will get IDE introspection. However, TestBox doesn't enforce the inheritance.
Typically test bundles are suffixed with the word Test or Spec, such as MyServiceSpec.bx or UserServiceTest.cfc
The CLI can assist you when creating new bundles:
Now you can run your tests via the browser (http://localhost:port/tests/runner.cfm)
or via the CLI testbox run
At runtime we provide the inheritance via mixins so you don't have to worry about it. However, if you want to declare the inheritance you can do so and this will give you the following benefits:
Some IDEs will be able to give you introspection for methods and properties
You will be able to use the HTML runner by executing directly the runRemote method on the CFC Bundle
Your tests will run faster
At runtime, TestBox will inject several public variables into your testing bundle to help you with your testing.
$mockbox : A reference to MockBox
$assert : A reference to our Assertions library
$utility : A utility CFC
Wether you inherit or not, your bundles will have a plethora of methods that will help you in your testing adeventure. Here is a link to the API Docs for the BaseSpec class:
The BaseSpec has a few shortcut methods for quick assertions. Please look at the and library for more in-depth usage.
These methods allow you to extend TestBox with custom and expectation .
These methods assist you with identifying environment conditions.
You can use the getEnv() to get access to our Environment utility object. From there you can use the following methods:
These methods are here to help you during the testing process. Every bundle also get's a debug buffer attached to its running results. This is where you as the developer can send pretty much any variable (simple or complex) and attach it to the debug buffer. This will then be presented acordingly in the test reporters or facilities.
TestBox is bundles with two amazing mocking facilities:
MockBox - Mocks objects and stubs
MockDataCFC - Allows you to mock data and JSON data -
These methods are used to create the BDD style of testing. You will discover them more in the section.
Life-Cycle Methods
Global Callbacks
Global callbacks affect the execution of the entire test bundle CFC and all of its suites and specs.
beforeAll()
Executes once before all specs for the entire test bundle CFC. A great place to initialize the environment the bundle needs for testing.
component{
function beforeAll(){
ORMSessionClear();
structClear( request );
// Prepare jwt driver to use cache instead of db for easier mocking
variables.jwt.getSettings().jwt.tokenStorage.driver = "cachebox";
variables.jwt.getSettings().jwt.tokenStorage.properties = { cacheName : "default" };
// Logout just in case
variables.securityService.logout();
}
}
afterAll()
Executes once after all specs for the entire test bundle CFC. A great place to teardown the environment the bundle needed for testing.
Copy
component{
function afterAll(){
variables.securityService.logout();
directoryDelete( "/tests/tmp", true );
}
}
run( testResults, testBox )
Executes once so it can capture all your describe and it blocks so they can be executed by a TestBox runner.
function run( testResults, testbox ){
describe("A Spec", function(){
});
}
You can find the API docs for testbox and the testResults arguments here:
Suite CallBacks
The following callbacks influence the execution of specification methods: it(), then(). The great flexibility of the BDD approach is that it allows you to nest describe, feature, story, given, scenario, when suite blocks to create very human readable and organized documentation for your tests. Each suite block can have its own life-cycle methods as well. Not only that, if they are nested, TestBox will walk the tree and call each beforeEach() and afterEach() in the order you declare them.
Executes before every single spec in a single suite block and receives the currently executing spec and any with. The body is a closure/lambda that will fire and the data argument is a way to with a struct of data that can flow down to specs.
The body closure will receive have the following signature:
Executes after every single spec in a single suite block and receives the currently executing spec and any with. The body is a closure/lambda that will fire and the data argument is a way to with a struct of data that can flow down to specs.
The body closure will receive have the following signature:
Here are some examples:
Executes around the executing spec so you can provide code that will surround the execution of the spec. It's like combining before and after in a single operation. The body is a closure/lambda that will fire and the data argument is a way to with a struct of data that can flow down to specs. This is the only way you can use CFML constructs that wrap around code like: try/catch, transaction, for, while, etc.
The body closure will receive have the following signature:
The spec is the currently executing specification, the suite is the suite this life-cycle is embedded in and data is the data binding, if any.
Here is an example:
When you use beforeEach(), afterEach(), and aroundEach() at the same time, there is a specific order they fire in. For a given describe block, they will fire in this order. Remember, aroundEach() is split into two parts-- the half of the method before you call spec.body() and the second half of the method.
beforeEach
aroundEach (first half)
it() (the spec.body() call)
Here's an example:
If there are more than one it() blocks, the process repeats for each one. Steps 1, 2, 4, 5 will wrap every single it().
When you nest more than one describe block inside the other, the before/around/after order is the same but drills down to the innermost describe and then bubbles back up. That means the outermost beforeEach() starts and we end on the outermost afterEach().
Here's what an example flow would look like that had before/after/around specified in two levels of describes with a single it() in the inner most describe.
Outermost beforeEach() call
Innermost beforeEach() call
Outermost aroundEach()
This works regardless of the number of levels and can obviously have many permutations, but the basic order is still the same. Before/around/after and starting at the outside working in, and back out again. This process happens for every single spec or it() block. This is as opposed to the beforeAll() and afterAll() method which only run once for the entire CFC regardless of how many specs there are.
Creating a Stub Object
In order to create a stub object you will use the : createStub() method.
public any createStub([boolean callLogging='true'], [extends], [implements])
Parameters:
callLogging - Add method call logging for all mocked methods
extends - Make the stub extend from certain CFC
implement - Make the stub adhere to an interface(s)
This method will create an empty stub object that you can use and mock with methods and properties. It can then be used in any code to satisfy dependencies meanwhile you build them. This is great to start working on projects where you are relying on other teams to build functionality but you have agreed on specific data or code interfaces. It is also super fancy as it can allow you to tell the stub to inherit from another CFC and look like it, or even pass in one or more interfaces that it must implement. If they are interfaces, then MockBox will generate all the necessary methods to satisfy those interfaces.
The createStub() method has an argument called extends that accepts a class path. This will create and generate a stub that physically extends that class path directly. This is an amazing way to create stubs that you can override with inherited functionality or just make it look like it is EXACTLY the type of object you want.
The createStub() method has an argument called implements that accepts a list of interface class paths you want the stub to implement. MockBox will then generate the stub and it will make sure that it implements all the methods the interfaces have defined as per their contract. This is such a fantastic and easy way to create a stub that looks and feels and actually has the methods an interface needs.
Modules
Extend TestBox your way!
TestBox supports the concepts of modules just like how ColdBox has modules. They are self-contained packages that can extend the functionality of TestBox. They can listen to test creations, errors, failures, skippings and much more. To get started you can use the TestBox CLI to generate a module for you:
A TestBox module layout is similar to a ColdBox Module layout. They have to be installed at /testbox/system/modules to be discovered and loaded and have one mandatory file: ModuleConfig.cfc which must exist in the root of the module folder.
You can install TestBox modules from ForgeBox via the install command:
TestBox will walk down the tree (from the outermost suite) for beforeEach() operations and out of the tree (from the innermost suite) for afterEach() operations.
Assertions are self-concatenated strings that evaluate an actual value to an expected value or condition. These are initiated by the global TestBox variable called $assert which contains tons of included assertion methods so you can evaluate your tests.
Evaluators
Each assertion evaluator will compare the actual value and an expected value or condition. It is responsible for either passing or failing this evaluation and reporting it to TestBox. Each evaluator also has a negative counterpart assertion by just prefixing the call to the method with a not expression.
Included Evaluators
TestBox has a plethora (That's Right! I said Plethora) of evaluators that are included in the release. The best way to see all the latest evaluator methods is to visit our API and digest the coldbox.system.Assertion class. There is also the ability to register and write custom assertion evaluators in TestBox via our addAssertions() function.
Custom Assertions
You can also register custom assertions within the $assert object. You will do this by reading our Custom Assertions section of our TestBox docs.
@DisplayName "My calculator features"
class{
property calc;
function setup(){
calc = new Calculator()
}
// Function name includes the word 'test'
// Using expectations library
function testAdd(){
expect( calc.add(1,1) ).toBe( 2 )
}
// Any name, but with a test annotation
// Using assertions library
@DisplayName "It can multiply two operands"
@test
function itCanMultiply(){
$assert.isEqual( calc.multiply(2,2), 4 )
}
}
function setup() {
super.setup();
if ( !isNull( request.testUserData ) ) {
getRequestContext().setValue( "x-auth-token", request.testUserData.token.access_token );
}
return;
}
function tearDown(){
request.clear()
}
function beforeTests() {
// Login User
variables.loggedInData = loginUser();
variables.loggedInUserId = variables.loggedInData.user.getUserId();
variables.testTimeOffEmployeeId = qb
.select( "FK_userId" )
.from( "timeOff" )
.where( "requestType", "vacation" )
.first()
.FK_userId;
}
function afterTests() {
variables.userService.clearCaches()
}
class{
function run(){
describe( "My calculator features", () => {
beforeEach( () => {
variables.calc = new Calculator()
} )
// Using expectations library
it( "can add", () => {
expect( calc.add(1,1) ).toBe( 2 )
} )
// Using assert library
test( "it can multiply", () => {
$assert.isEqual( calc.multiply(2,2), 4 )
} )
} )
}
}
/**
* My calculator features
*/
class{
property calc;
function setup(){
calc = new Calculator()
}
// Function name includes the word 'test'
// Using expectations library
function testAdd(){
expect( calc.add(1,1) ).toBe( 2 )
}
// Any name, but with a test annotation
// Using assertions library
@test
function itCanMultiply(){
$assert.isEqual( calc.multiply(2,2), 4 )
}
}
component{
function run(){
describe( "My calculator features", () => {
beforeEach( () => {
variables.calc = new Calculator()
} );
// Using expectations library
it( "can add", () => {
expect( calc.add(1,1) ).toBe( 2 )
} );
// Using assert library
test( "it can multiply", () => {
$assert.isEqual( calc.multiply(2,2), 4 )
} );
} );
}
}
/**
* My calculator features
*/
component{
property calc;
function setup(){
calc = new Calculator()
}
// Function name includes the word 'test'
// Using expectations library
function testAdd(){
expect( calc.add(1,1) ).toBe( 2 )
}
// Any name, but with a test annotation
// Using assertions library
function itCanMultiply() test{
$assert.isEqual( calc.multiply(2,2), 4 )
}
}
function( currentSpec, data ){
}
(currentSpec, data ) => {}
function( currentSpec, data ){
}
(currentSpec, data ) => {}
component{
function run( testResults, testBox ){
describe("A Spec", function(){
beforeEach( function( currentSpec, data ){
// before each spec in this suite
});
afterEach( function( currentSpec, data ){
// after each spec in this suite
});
describe("A nested suite", function(){
// my parent's aroundEach()
beforeEach( ( currentSpec, data ) => {
// before each spec in this suite + my parent's beforeEach()
});
afterEach( ( currentSpec, data ) => {
// after each spec in this suite + my parent's afterEach()
});
});
});
describe("A second spec", function(){
beforeEach( function( currentSpec, data ){
// before each spec in this suite, separate from the two other ones
});
afterEach( function( currentSpec, data ){
// after each spec in this suite, separate from the two other ones
});
});
}
}
component{
function run( testResults, testBox ){
describe("A Spec", function(){
aroundEach( function( spec, suite, data ){
ormClearSession();
ormCloseSession();
try {
// Make sure we always rollback
transaction {
arguments.spec.body();
}
} catch ( any e ) {
transactionRollback();
rethrow;
}
});
describe("A nested suite", function(){
// my parent's aroundEach()
beforeEach( function( currentSpec, data ){
// before each spec in this suite + my parent's beforeEach()
});
afterEach( function( currentSpec, data ){
// after each spec in this suite + my parent's afterEach()
});
});
});
}
}
describe( 'my describe', function(){
beforeEach( function( currentSpec ){
// I run first
} );
aroundEach( function( spec, suite ){
// I run second
arguments.spec.body();
// I run fourth
});
afterEach( function( currentSpec ){
// I run fifth
} );
it( 'my it', function(){
// I run third
} );
} );
component displayName="TestBox xUnit suite for CF9" labels="railo,cf"{
/*********************************** LIFE CYCLE Methods ***********************************/
function beforeTests(){
application.salvador = 1;
}
function afterTests(){
structClear( application );
}
function setup(){
request.foo = 1;
}
function teardown(){
structClear( request );
}
/*********************************** Test Methods ***********************************/
function testIncludes(){
$assert.includes( "hello", "HE" );
$assert.includes( [ "Monday", "Tuesday" ] , "monday" );
}
function testIncludesWithCase(){
$assert.includesWithCase( "hello", "he" );
$assert.includesWithCase( [ "Monday", "Tuesday" ] , "Monday" );
}
function testnotIncludesWithCase(){
$assert.notincludesWithCase( "hello", "aa" );
$assert.notincludesWithCase( [ "Monday", "Tuesday" ] , "monday" );
}
function testNotIncludes(){
$assert.notIncludes( "hello", "what" );
$assert.notIncludes( [ "Monday", "Tuesday" ] , "Friday" );
}
function testIsEmpty(){
$assert.isEmpty( [] );
$assert.isEmpty( {} );
$assert.isEmpty( "" );
$assert.isEmpty( queryNew("") );
}
function testIsNotEmpty(){
$assert.isNotEmpty( [1,2] );
$assert.isNotEmpty( {name="luis"} );
$assert.isNotEmpty( "HelloLuis" );
$assert.isNotEmpty( querySim( "id, name
1 | luis") );
}
function testSkipped() skip{
$assert.fail( "This Test should fail" );
}
boolean function isRailo(){
return structKeyExists( server, "railo" );
}
function testSkippedWithConstraint() skip="isRailo"{
$assert.fail( "This Test should fail" );
}
function testFails(){
//$assert.fail( "This Test should fail" );
}
function testFailsShortcut() labels="railo"{
//fail( "This Test should fail" );
}
function testAssert() {
$assert.assert( application.salvador == 1 );
}
function testAssertShortcut() {
assert( application.salvador == 1 );
}
function testisTrue() {
$assert.isTrue( 1 );
}
function testisFalse() {
$assert.isFalse( 0 );
}
function testisEqual() {
$assert.isEqual( 0, 0 );
$assert.isEqual( "hello", "HEllO" );
$assert.isEqual( [], [] );
$assert.isEqual( [1,2,3, {name="hello", test="this"} ], [1,2,3, {test="this", name="hello"} ] );
}
function testisNotEqual() {
$assert.isNotEqual( this, new coldbox.system.MockBox() );
$assert.isNotEqual( "hello", "test" );
$assert.isNotEqual( 1, 2 );
$assert.isNotEqual( [], [1,3] );
}
function testisEqualWithCase() {
$assert.isEqualWithCase( "hello", "hello" );
}
function testnullValue() {
$assert.null( javaCast("null", "") );
}
function testNotNullValue() {
$assert.notNull( 44 );
}
function testTypeOf() {
$assert.typeOf( "array", [ 1,2 ] );
$assert.typeOf( "boolean", false );
$assert.typeOf( "component", this );
$assert.typeOf( "date", now() );
$assert.typeOf( "time", timeformat( now() ) );
$assert.typeOf( "float", 1.1 );
$assert.typeOf( "numeric", 1 );
$assert.typeOf( "query", querySim( "id, name
1 | luis") );
$assert.typeOf( "string", "hello string" );
$assert.typeOf( "struct", { name="luis", awesome=true } );
$assert.typeOf( "uuid", createUUID() );
$assert.typeOf( "url", "http://www.coldbox.org" );
}
function testNotTypeOf() {
$assert.notTypeOf( "array", 1 );
$assert.notTypeOf( "boolean", "hello" );
$assert.notTypeOf( "component", {} );
$assert.notTypeOf( "date", "monday" );
$assert.notTypeOf( "time", "1");
$assert.notTypeOf( "float", "Hello" );
$assert.notTypeOf( "numeric", "eeww2" );
$assert.notTypeOf( "query", [] );
$assert.notTypeOf( "string", this );
$assert.notTypeOf( "struct", [] );
$assert.notTypeOf( "uuid", "123" );
$assert.notTypeOf( "url", "coldbox" );
}
function testInstanceOf() {
$assert.instanceOf( new coldbox.system.MockBox(), "coldbox.system.MockBox" );
}
function testNotInstanceOf() {
$assert.notInstanceOf( this, "coldbox.system.MockBox" );
}
function testMatch(){
$assert.match( "This testing is my test", "(TEST)$" );
}
function testMatchWithCase(){
$assert.match( "This testing is my test", "(test)$" );
}
function testNotMatch(){
$assert.notMatch( "This testing is my test", "(hello)$" );
}
function testKey(){
$assert.key( {name="luis", awesome=true}, "awesome" );
}
function testNotKey(){
$assert.notKey( {name="luis", awesome=true}, "test" );
}
function testDeepKey(){
$assert.deepKey( {name="luis", awesome=true, parent = { age=70 } }, "age" );
}
function testNotDeepKey(){
$assert.notDeepKey( {name="luis", awesome=true, parent = { age=70 } }, "luis" );
}
function testLengthOf(){
$assert.lengthOf( "heelo", 5 );
$assert.lengthOf( [1,2], 2 );
$assert.lengthOf( {name="luis"}, 1 );
$assert.lengthOf( querySim( "id, name
1 | luis"), 1 );
}
function testNotLengthOf(){
$assert.notLengthOf( "heelo", 3 );
$assert.notLengthOf( [1,2], 5 );
$assert.notLengthOf( {name="luis"}, 5 );
$assert.notLengthOf( querySim( "id, name
1 | luis"), 0 );
}
// railo 4.1+ or CF10+
function testThrows(){
$assert.throws(function(){
var hello = invalidFunction();
});
}
// railo 4.1+ or CF10+
function testNotThrows(){
$assert.notThrows(function(){
var hello = 1;
});
}
/*********************************** NON-RUNNABLE Methods ***********************************/
function nonStandardNamesWillNotRun() {
fail( "Non-test methods should not run" );
}
private function privateMethodsDontRun() {
fail( "Private method don't run" );
}
}
$customMatchers : A collection of custom matchers registered
$exceptionAnnotation : The annotation used to discover expected exceptions, defaults to expectedException
$testID : A unique identifier for the test bundle
$debugBuffer : The debugging buffer stream
# Create a BDD Bundle
testbox create bdd --help
# Create an xUnit Bundle
testbox create unit --help
# Examples
# Remember that by convention it will create bundles at /tests/specs
testbox create bdd CalculatorTest --open
testbox create unit name=SecurityTest directory="tests/specs/unit/"
// Assert that the expression is truthy
assert( expression, [message=""] )
// Start an expectation with an actual value, returns the Expectation object
expect( actual ) : Expectation
// Fail now!
fail( message )
// In BoxLang you can use the dynamic assertions feature
// Meaning you can execute any assertion method by just prefixing it with
// the word `asssert{method}`
assertIsEqual()
assertIsTrue()
assertIsFalse()
... etc.
// This leverages the dynamic on missing method in BoxLang but not available in CFML
// Which language/engine are you running on
isAdobe()
isLucee
isBoxLang()
// What OS are we on
isLinux()
isMac()
isWindows()
// Get the Environment Class
getEnv()
// Get a java property or environment setting or a default value
getSystemSetting( required key, [defaultValue] )
// Get a java system property ONLY
getSystemProperty( required key, [defaultValue] )
// Get a java environment setting ONLY
getEnv( required key, [defaultValue] )
// Get the java.lang.System
getJavaSystem()
// Send variables to the output console
console(any var, [numeric top='9999'], [boolean showUDFs='false'], [string label=''])
// Send data to the TestBox debug buffer
debug([any var], [string label=''], [boolean deepCopy='false'], [numeric top='999'], [boolean showUDFs='false'])
// Clear the buffer
clearDebugBuffer()
// Get the debug buffer
getDebugBuffer()
// Writes to the Output Buffer (CLI, Browser)
// Remember that if your test runs in the CLI, the buffer is the console
// If you are in a webserver, the buffer is the browser output
print( message )
printLn( message )
createMock([string className], [any object], [boolean clearMethods='false'])
createEmptyMock([string className], [any object], [boolean callLogging='true'])
prepareMock([any object], [boolean callLogging='true'])
createStub([boolean callLogging='true'], [string extends=''], [string implements=''])
// Create a mock query of data
querySim( queryData )
// Call the `mockData()` method on the MockDataCFC
mockData( arguments )
// Make a private/package method on a class public
makePublic(any target, string method, [string newName=''])
// Get the value of a private property on a class
getProperty( target, name, scope, defaultValue )
// Get the MockBox class
getMockBox( [string generationPath=''] )
component extends="testbox.system.BaseSpec"{
function run(){
describe( "My First Test", ()=>{
test( "it can add", ()=>{
expect( sum( 1, 2 ) ).toBe( 3 );
} );
} );
}
private function sum( a, b ){
return a + b;
}
}
classextends="testbox.system.BaseSpec"{ function run(){describe("My First Test",()=>{ test("it can add",()=>{ expect( sum(1,2)).toBe(3)})})}private function sum(a,b){return a + b}}
There is no WireBox
There is no Routing
There is no Scheduling
There is no Interceptors
There is no Views
Inception works, but limited
No module dependencies, all modules are loaded in discovered order
This is the main descriptor file for your TestBox module.
It must have three mandatory callbacks:
configure() - Configures the module for operation
onLoad() - When the module is now activated
onUnload() - When the module is deactivated
The following are the injected properties:
Property
Description
ModulePath
The module’s absolute path
ModuleMapping
The module’s invocation path
TestBox
The testbox reference
The following are injected methods:
Method
Description
getEnv()
Get an environment variable
getSystemSetting()
Get a Java system setting
getSystemProperty()
Get a Java system property
If a module fails to be activated, it will still be in the module registry but marked inactive via the active boolean key in its registry entry. You will also find the cause of the failure in the console logs and the key activationFailure of the module's registry entry.
This ModuleConfig can also listen to the following test life-cycle events. It will also receive several arguments to the call. Here are the common descriptions of the arguments
target - The bundle in question
testResults - The TestBox results object
suite - The suite descriptor
suiteStats - The stats for the running suite
exception - A ColdFusion exception
spec - The spec descriptor
specStats - The stats of the running spec
Callback
Arguments
onBundleStart()
target
testResults
onBundleEnd()
target
testResults
onSuiteStart()
target
testResults
suite
You can also manually register and activate modules by using the registerAndActivate( invocationPath ) method of the TestBox object. All you have to do is pass the invocation path to your modules' root folder:
That's it! It will register it and activate and be ready to listen.
Not all ColdBox/CommandBox modules can be TestBox modules. Remember that TestBox modules are extremely lightweight and testing focused.
Testing Callbacks
Manual Registration
TestBoxVersion
The version of TestBox being used
getJavaSystem()
Get the Java system class
onSuiteEnd()
target
testResults
suite
onSuiteError()
exception
target
testResults
suite
onSuiteSkipped()
target
testResults
suite
onSpecStart()
target
testResults
suite
spec
onSpecEnd()
target
testResults
suite
spec
onSpecFailure()
exception
spec
specStats
suite
suiteStats
testResults
onSpecSkipped()
spec
specStats
suite
testResults
onSpecError()
exception
spec
specStats
suite
suiteSpecs
testResults
Specs
A spec is a declaration that will usually test your system with a requirement. They are defined by calling the TestBox it() global function, which takes in a title and a body function/closure. The title is the title of this spec you will write and the body function/closure is a block of code that represents the spec.
A spec will contain most likely one or more expectations that will test the state of the SUT (software under test) or sometimes referred to as code under test. In BDD style, your specifications are what is used to validate your requirements of a scenario which is your describe() block of your story.
function run(){
describe("A suite", function(){
it("contains spec with an awesome expectation", function(){
expect( true ).toBeTrue();
});
it("contains a spec with more than 1 expectation", function(){
expect( [1,2,3] ).toBeArray();
expect( [1,2,3] ).toHaveLength( 3 );
});
});
}
An expectation is a nice assertion DSL that TestBox exposes so you can pretty much read what should happen in the testing scenario. A spec will pass if all expectations pass. A spec with one or more expectations that fail will fail the entire spec.
Argument
Required
Default
Type
Description
Since the implementations of the describe() and it() functions are closures, they can contain executable code that is necessary to implement the test. All CFML rules of scoping apply to , so please remember them. We recommend always using the variables scope for easy access and distinction.
The data argument can be used to pass in a structure of data into the spec so it can be used later within the body closure. This is great when doing looping and creating dynamic closure calls:
Github Actions
is an automation platform built in to GitHub.com that makes it easy to automate code quality on your github repos. There are a number of integrations that make using TestBox inside GitHub Actions simple, speedy and powerful so you can get back to writing code.
FREE for public repositories
2,000 minutes for private repos
body
true
---
closure/udf
The closure that represents the spec
labels
false
---
string/array
The list or array of labels this suite group belongs to
skip
false
false
Boolean
A flag or a closure that tells TestBox to skip this suite group from testing if true. If this is a closure it must return boolean.
data
false
{}
struct
A struct of data you can bind the spec with so you can use within the body closure
title
true
---
string
The it() function is also aliased as then() - except it() has title when then() uses then instead
Arguments
They are closures Ma!
Spec Data Binding
When using the then() function instead of it() the title argument name is then instead of title for the it() function
Testing your application with TestBox in GitHub Actions (GHA) begins a workflow.yml file at the root of a .github/workflows/ directory. You can name this file anything you like - I'd suggest build.yml or test.yml - but if it is not a valid Yaml file the GHA workflow will fail.
This file should start with some GHA metadata to dictate when and how the workflow should run:
This will run the workflow on each commit to the master or main branch. Next, specify a workflow job to execute:
Under the jobs.tests.steps is where we will place each sequential testing step. First, we need to check out the repository code and install Java and CommandBox:
If we need to install dependencies, we would do that now:
And finally, we can start a CFML server of our choice using CommandBox, before using the testbox run command to run our test suite:
If you are using a testing matrix to test against multiple CFML engines, replace [email protected] with ${{ matrix.cfengine }}. See an example here
The full example would look something like this:
In order for the box testbox run to execute correctly, our box.json in our project must be able to connect to our server and know which tests to execute. Here's a basic example showing the most important testbox property: the testbox.runner property:
CBORM is an ORM utility wrapper for ColdBox that takes the pain out of using ORM in CFML. CBORM uses GitHub Actions to test all new commits, to package up new module versions, and even to format all CFML code for every new PR.
function run(){
describe("A suite is a closure", function(){
c = new Calculator();
it("and so is a spec", function(){
expect( c ).toBeTypeOf( 'component' );
});
});
}
// Simple Example
it( title="can handle binding", body=function( data ){
expect( data.keep ).toBeTrue();
}, data={ keep = true } );
// Complex Example. Let's iterate over a bunch of files and create dynamic specs
for( var filePath in files ){
it(
title="#getFileFromPath( filePath )# should be valid JSON",
// pass in a struct of data to the spec for later evaluation
data={ filePath = filePath },
// the spec closure accepts the data for later evaluation
body=function( data ) {
var json = fileRead( data.filePath );
var isItJson = isJSON( json );
expect( json ).notToBeEmpty();
expect( isItJson ).toBeTrue();
if( isItJson ){
var jsonData = deserializeJSON(json);
if( getFileFromPath( filePath ) != "index.json"){
expect( jsonData ).toHaveKey( "name" );
expect( jsonData ).toHaveKey( "type" );
}
}
});
}
# .github/workflows/tests.yml
name: Test
on:
push:
branches:
- main
- master
- development
jobs:
tests:
name: Tests
runs-on: ubuntu-latest
steps:
- # All job steps go here
- name: Start server
run: box server start [email protected] --noSaveSettings
- name: Run TestBox Tests
run: box testbox run
# .github/workflows/tests.yml
name: Test
on:
push:
branches:
- main
- master
- development
jobs:
tests:
name: Tests
runs-on: ubuntu-latest
steps:
- name: Checkout Repository
uses: actions/checkout@v2
with:
fetch-depth: 0
- name: Setup Java
uses: actions/setup-java@v2
with:
distribution: "adopt"
java-version: "11"
- name: Setup CommandBox
uses: Ortus-Solutions/setup-commandbox@main
- name: Install dependencies
run: box install
- name: Start server
run: box server start [email protected] --noSaveSettings
- name: Run TestBox Tests
run: box testbox run
{
"name" : "Package Name",
// ForgeBox unique slug
"slug" : "",
// semantic version of your package
"version" : "1.0.0+buildID",
// author of this package
"author" : "Luis Majano <[email protected]>",
// location of where to download the package, overrides ForgeBox location
"location" : "URL,Git/svn endpoint,etc",
// testbox integration
testbox :{
// The location of the runner
runner : [
{ "default": "http://localhost:8080/tests/runner.cfm" }
]
}
}
ANT Runner
In our test harness we include an ANT runner (test.xml) that will be able to execute your tests via ANT.
Ant is a Java-based build tool from Apache designed to automate the software build process. Unlike traditional build tools that rely on shell commands, Ant uses XML to describe the build process and its dependencies, making it platform-independent and flexible. It is particularly useful for Java projects to compile code, manage dependencies, and create deployment packages.
It can also leverage our ANTJunit reporter to use the junitreport task to produce JUnit compliant reports as well.
<?xml version="1.0"?>
<--<
This ANT build can be used to execute your tests with automation using our included runner.cfm.
You can executes directories, bundles and so much more. It can also produce JUnit reports using the
ANT junitreport tag. This is meant to be a template for you to spice up.
There are two targets you can use: run and run-junit
Execute the default 'run' target
ant -f test.xml
OR
ant -f test.xml run
Execute the 'run-junit' target
ant -f test.xml run-junit
PLEASE NOTE THAT YOU MUST ALTER THE RUNNER'S URL ACCORDING TO YOUR ENVIRONMENT.
-->
<project name="testbox-ant-runner" default="run" basedir=".">
<-- <THE URL TO THE RUNNER, PLEASE CHANGE ACCORDINGLY-->
<property name="url.runner" value="http://localhost/tests/runner.cfm?"/>
<-- <FILL OUT THE BUNDLES TO TEST, CAN BE A LIST OF CFC PATHS -->
<property name="test.bundles" value="" />
<-- <FILL OUT THE DIRECTORY MAPPING TO TEST -->
<property name="test.directory" value="test.specs" />
<-- <FILL OUT IF YOU WANT THE DIRECTORY RUNNER TO RECURSE OR NOT -->
<property name="test.recurse" value="true" />
<-- <FILL OUT THE LABELS YOU WANT TO APPLY TO THE TESTS -->
<property name="test.labels" value="" />
<-- <FILL OUT THE TEST REPORTER YOU WANT, AVAILABLE REPORTERS ARE: ANTJunit, Codexwiki, console, dot, doc, json, junit, min, raw, simple, tap, text, xml -->
<property name="test.reporter" value="simple" />
<-- <FILL OUT WHERE REPORTING RESULTS ARE STORED -->
<property name="report.dir" value="${basedir}/results" />
<property name="junitreport.dir" value="${report.dir}/junitreport" />
<target name="init" description="Init the tests">
<mkdir dir="${junitreport.dir}" />
<tstamp prefix="start">
<format property="TODAY" pattern="MM-dd-YYYY hh:mm:ss aa"/>
</tstamp>
<concat destfile="${report.dir}/latestrun.log">Tests ran at ${start.TODAY}</concat>
</target>
<target name="run" depends="init" description="Run our tests and produce awesome results">
<-- <Directory Runner
Executes recursively all tests in the passed directory and stores the results in the
'dest' param. So if you want to rename the file, do so here.
Available params for directory runner:
- Reporter
- Directory
- Recurse
- Labels
-->
<get dest="${report.dir}/results.html"
src="${url.runner}&directory=${test.directory}&recurse=${test.recurse}&reporter=${test.reporter}&labels=${test.labels}"
verbose="true"/>
<-- <Bundles Runner
You can also run tests for specific bundles by using the runner with the bundles params
Available params for runner:
- Reporter
- Bundles
- Labels
<get dest="${report.dir}/results.html"
src="${url.runner}&bundles=${test.bundles}&reporter=${test.reporter}&labels=${test.labels}"
verbose="true"/>
-->
</target>
<target name="run-junit" depends="init" description="Run our tests and produce ANT JUnit reports">
<-- <Directory Runner
Executes recursively all tests in the passed directory and stores the results in the
'dest' param. So if you want to rename the file, do so here.
Available params for directory runner:
- Reporter = ANTJunit fixed
- Directory
- Recurse
- Labels
- ReportPath : The path where reports will be stored, by default it is the ${report.dir} directory.
-->
<get dest="${report.dir}/results.xml"
src="${url.runner}&directory=${test.directory}&recurse=${test.recurse}&reporter=ANTJunit&labels=${test.labels}&reportPath=${report.dir}"
verbose="true"/>
<-- <Bundles Runner
You can also run tests for specific bundles by using the runner with the bundles params
Available params for runner:
- Reporter
- Bundles
- Labels
<get dest="${report.dir}/results.html"
src="${url.runner}&bundles=${test.bundles}&reporter=${test.reporter}&labels=${test.labels}"
verbose="true"/>
-->
<-- <Create fancy junit reports -->
<junitreport todir="${junitreport.dir}">
<fileset dir="${report.dir}">
<include name="TEST-*.xml"/>
</fileset>
<report format="frames" todir="${junitreport.dir}">
<param name="TITLE" expression="My Awesome TestBox Results"/>
</report>
</junitreport>
</target>
</project>
Now you can run the commands
# Execute the default 'run' target
ant -f test.xml
# Execute a specific target
ant -f test.xml run-junit
By installing the CommandBox TestBox CLI you can get access to our CommandBox runner. The CommandBox runner leverages the HTTP(s) protocol to test against any server. By default it will inspect your box.json for a default runner or try to connect to /tests/runner.cfm by default.
To see all the running options run the following in your CLI shell:
testbox run help
testbox run directory="tests.specs" outputFormats="json,junit,html"
testbox run runner="http://myremoteapp.com/tests/runner.cfm"
It can also produce reports for you in JSON, HTML, and JUNIT.
Runner Options
If you type testbox run --help you can see all the arguments you can set for running your tests. However, please note that you can also pre-set them in your box.json under the testbox entry:
You can also set up the default runner URL in your box.json and it will be used for you. Setting the URL is a one-time operation.
You can also use a relative path and CommandBox will look up the host and port from your server settings.
The default runner URL of the testbox run command is /tests/runner.cfm so there's actually no need to even configure it if you're using the default convention location for your runner.
You can define multiple URLs for your runners by using a JSON array of objects. Each key will be a nice identifier you can use via the runner=key argument in the command.
Then you can just pass in the name:
More Commands:
The CLI also comes with a code watcher and runner. It will watch any paths for you, and if it detects any changes, it will run the tests you want.
In order for this command to work, you need to have started your server and configured the URL to the test runner in your box.json.
You can also control what files to watch.
If you need more control over what tests run and their output, you can set additional options in your box.json which will be picked up automatically by testbox run when it fires.
This command will run in the foreground until you stop it. When you are ready to shut down the watcher, press Ctrl+C.
package set testbox.runner="[ { default : 'http://localhost/tests/runner.cfm' } ]" --append
package show testbox.runner
testbox run default
testbox watch help
package set testbox.runner=http://localhost:8080/tests/runner.cfm
server start
testbox watch
testbox watch **.cfc
package set testbox.verbose=false
package set testbox.labels=foo
package set testbox.testSuites=bar
package set testbox.watchDelay=1000
package set testbox.watchPaths=/models/**.cfc